Diaphragm Modeling Tips
Modeling a Rigid Diaphragm in RISA-3D
In the Diaphragms spreadsheet:
-
Enter the
-
Designate the Plane the diaphragm will act.

Click on image to enlarge it
Internally, the Rigid Diaphragm ties all nodes at that elevation together with Rigid links.

To view the diaphragm:
-
Click the
 Toggle Display of Diaphragms button .
 This allows you to visually see the location of the diaphragms. Inactive diaphragms do not show up graphically.

Click on image to enlarge it
-
(Optional) From here you can run the Wind and Seismic load generators.

Axial Load Limitation
Members in the plane of the diaphragm will have no axial load attributed to them. This is because the internal rigid links that are created to achieve rigid behavior take the entire load. In these cases, the axial loads in these members will need to be considered outside of the program.
Openings in a RISA-3D Only Model
If there are openings within the defined diaphragm, where portions of the structure are not rigidly connected, it is possible to disconnect those locations from the diaphragm in the

Click on image to enlarge it
Use of Rigid Diaphragms with the Top of Member Offset
Never use Top of Member Offsets with the diaphragm feature. This combination will almost surely make the forces in the member incorrect. This is because a Vierendeel-type truss is created, where the internal rigid links created by the diaphragm feature acts as a top flange and the member acts as the bottom flange. What now is drawn as a single member has multiple internal members influencing these forces.

Click on image to enlarge it
Partial Diaphragms in a RISA-3D Only Model
There may be times when you want to model a partial diaphragm, i.e., a diaphragm that extends over only a portion of a floor or plane. For example, let’s say you are trying to model a floor that is composed of a relatively rigid section (thick concrete slab) and a relatively flexible section (corrugated steel decking). You would like a way to model a rigid diaphragm for only the rigid portion of the floor.
To accomplish this, specify that
a
To detach
a
-
Select the Detach from Diaphragm option in the
-
Specify the
Another way this can be done is to offset
the elevations of the
|
Click on image to enlarge it |
Click on image to enlarge it |


Partial Diaphragms in a Combined RISAFloor/RISA-3D Model
For buildings where a flexible diaphragm and rigid diaphragm occur on the same floor you can model the diaphragms using separate slab edges. This will require a gap between the framing of the two diaphragms however, such that load will not automatically be shared between the diaphragms.
The following image is an example of the gap:

Click on image to enlarge it
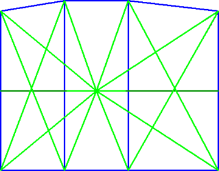
Sloped Roof Flexible Diaphragms (RISAFloor/RISA-3D Integration)
The flexible diaphragms at sloped roofs require members that are in the horizontal plane to attribute load to. These members must exist at the base roof elevation. For that reason, in the example below, the program reports "Loads are not attributed for Diaphragm". In the direction perpendicular to the ridge, there are no members for the program to attribute the wall wind loads to, so no loads are attributed to the diaphragm at all in that direction.
To correct this issue, simply draw horizontal bracing in the structure which can pick up the load and transmit it to the main lateral force resisting system.

Click on image to enlarge it
For additional advice on this topic, please see the RISA Tips & Tricks webpage at risa.com/post/support. Type in Search keywords: Sloped Roofs.