Basic Load Cases
When loads are defined they are grouped into basic load cases (BLC's). You are allowed up to 1000 separate Basic Load Cases. These are the basic building blocks of the final load combinations applied to the structure. The basic load cases may be assigned to load categories such as dead load and live load. These basic cases and categories are then combined to define load combinations used in analysis. A BLC can be comprised of any type of load, such as joint loads, distributed loads, member point loads, etc.
Any time you are applying or viewing loads, graphically or in the spreadsheets, they are assigned to the current basic load case. The current basic load case is displayed in the
Access the Basic Load Cases spreadsheet from the ‘Home’ ribbon by clicking on the Basic Load Cases icon, or from the ‘Explorer’ panel under the ‘Data Entry’ section.
Click on image to enlarge it
When Adding Loads to a Basic Load Case
- When adding loads graphically, click on the toolbar button for the type of load you wish to add and specify the BLC along with the load definition.
- When adding loads with the spreadsheets, open the spreadsheet for the load type you want to add and select the BLC from the list on the Window Toolbar.
Basic Load Case Spreadsheet
The Basic Load Cases spreadsheet groups and summarizes the loads applied to the model. Access the Basic Load Cases spreadsheet from the ‘Home’ ribbon by clicking on the Basic Load Cases icon. Note that you can also access it from the ‘Explorer’ panel under the ‘Data Entry’ section.
Click on image to enlarge it
Information about Basic Load Cases (BLC’s) is recorded on the Basic Load CaseSpreadsheet and the loads themselves are recorded in the load spreadsheets for each load type.
You can enter descriptions for each BLC in the first column.These descriptions are primarily for your own use. The descriptions will print as part of the input printout and you can also display the description when plotting the loads for the BLC or choosing them from the list.
The second column is used to assign the BLC to a load category such as Dead Load or Live Load. Simply choose the category from the drop down list. You can then build load combinations for analysis by referring to the categories rather than list each basic load case.
The next

The remaining columns display the quantity of each type of load that is contained in the BLC. You can not edit these values but You can click on the quantities to open the spreadsheet and view the loads that it represents. For example, the previous figure has
Copy Basic Load Cases
You can copy the loads from one BLC into another BLC. This can be useful when one load case is similar to another and can be entered quickly by copying a load case and then making changes to the copy with features such as block math.
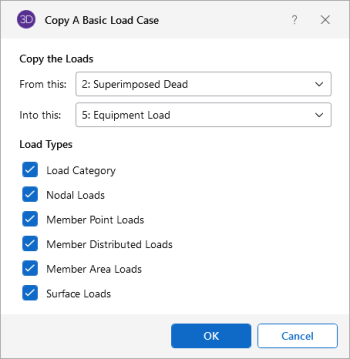
To do this, open the Basic Load Case spreadsheet and right click on the load case that you wish to copy and select Copy Basic Load Case from the drop-down list. The Copy A Basic Load Case dialogue will open and allows you to specify the load case that you want to copy the loads into, as well as the types of loads that you want to copy. For example, if you check Nodal Loads and uncheck all the other load types, only the nodal loads will be copied.
Click on image to enlarge it
Any loads copied into a BLC will be added to any loads that may already exist in that BLC.
Delete Basic Load Cases
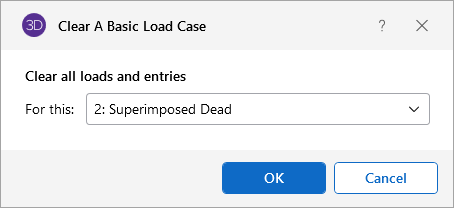
You can automatically clear all the loads in a BLC. To do this, open the Basic Load Case spreadsheet and then right click on the load case that you wish to delete and select Clear Basic Load Case from the drop-down list.

All of the loads in this BLC will be deleted including the description, category information and any self-weight information.
Scale Basic Load Cases
You can apply a scaling factor to an entire Basic Load Case in the Basic Load Case spreadsheet. These scaling factors give the user the flexibility and freedom to modify and manipulate the loading conditions in the model.
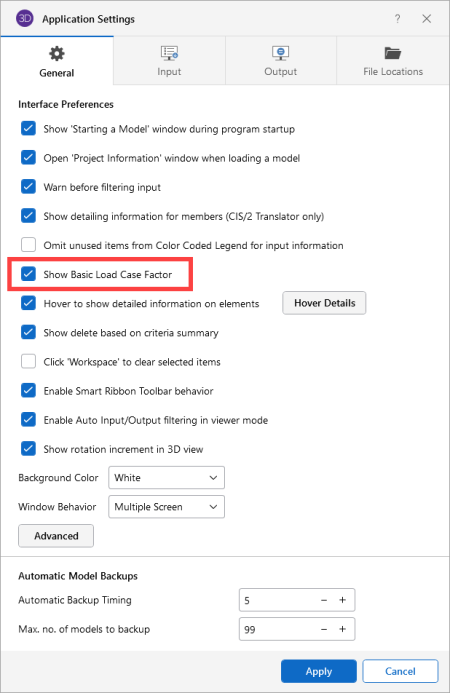
To use this feature, you will need to enable it in the Application Settings. By default, the program will have this feature inactivated.
Click on image to enlarge it
Once enabled, a new column appears in the Basic Load Case spreadsheet. Basic Load Cases may be scaled by both negative and positive values.
Click on image to enlarge it
Load Categories
The basic load cases may be assigned to load categories, such as dead load and live load, which are commonly used in building codes. You can do this on the Basic Load Cases spreadsheet. These categories may then be combined to define load combinations used in analysis.
Categories are easy to use and are very helpful. They allow you to place your loads into groups that are commonly used in load combinations, while keeping them in separate load cases. This is especially helpful in large models where the loads might occupy many different load cases. They also allow you to define load combinations that are easily understood because they resemble the combinations as they appear in the building code.
| Load Category | Description |
|---|---|
| DL | Dead Load |
| LL | Live Load |
| EL | Earthquake Load |
| WL | Wind Load |
| SL | Snow Load |
| RLL | Roof Live Load |
| LLS | Live Load Special (public assembly, garage, storage, etc.) |
| TL | Long Term Load (creep, shrinkage, settlement, thermal, etc.) |
| SLN | Snow Load Non-shedding |
| HL | Hydrostatic Load |
| FL | Fluid Pressure Load |
| RL | Rain Load |
| PL | Ponding Load |
| EPL | Earth Pressure Load |
| IL | Impact Load |
| OL1 - OL100 | Other Load 1 - 100 (generic) |
| ELX, ELY, ELZ | Earthquake Load along global X-axis, Y-axis, Z-axis |
| WLX, WLY, WLZ | Wind Load along global X-axis, Y-axis, Z-axis |
| WL+X, WL+Y, WL+Z | Wind Load along positive global X-axis, Y-axis, Z-axis |
| WL-X, WL-Y, WL-Z | Wind Load along negative global X-axis, Y-axis, Z-axis |
| WLXP1, WLYP1, WLZP1 | Partial Wind Load 1 along global X-axis, Y-axis, Z-axis |
| WLXP2, WLYP2, WLZP2 | Partial Wind Load 2 along global X-axis, Y-axis, Z-axis |
| ELX+Z, ELX+Y | Eccentric Earthquake Load along global X-axis shifted along positive global Z-axis, Y-axis |
| ELX-Z, ELX-Y | Eccentric Earthquake Load along global X-axis shifted along negative global Z-axis, Y-axis |
| ELZ+X, ELZ+Y | Eccentric Earthquake Load along global Z-axis shifted along positive global X-axis, Y-axis |
| ELZ-X, ELZ-Y | Eccentric Earthquake Load along global Z-axis shifted along negative global X-axis, Y-axis |
| ELY+X, ELY+Z | Eccentric Earthquake Load along global Y-axis shifted along positive global X-axis, Z-axis |
| ELY-X, ELY-Z | Eccentric Earthquake Load along global Y-axis shifted along negative global X-axis, Z-axis |
| NL, NLX, NLY, NLZ | General notional load and along global X-axis, Y-axis, Z-axis |
| WLX+R, WLY+R, WLZ+R, WLX-R, WLY-R, WLZ-R, | Roof wind loads in the positive and negative X-axis, Y-axis, Z-axis |
Using categories is optional. Remember though that if you define combinations of categories you must define these categories in the Basic Load Case spreadsheet. If you don't, the combinations will have no loads.


