Beams
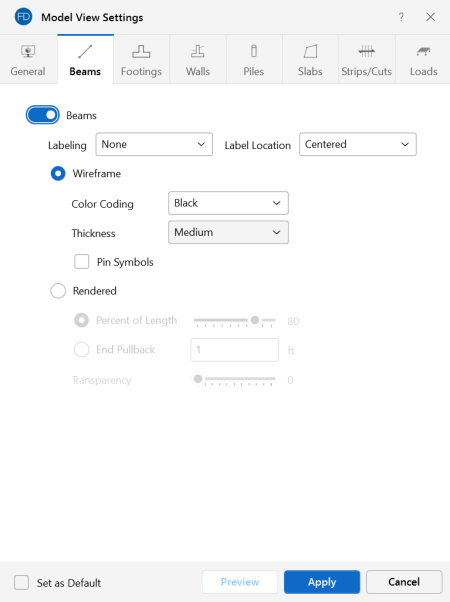
Access the graphical Model View Settings for beams by clicking the Model icon in the View Settings section of the View ribbon and selecting the Beams tab shown below.
Click on image to enlarge it
You can specify that no beams are displayed, or you can show them with a Label, Color Code or Rendered.
Click on the Beams slider to not display the beams in the model at all. The Labeling drop-down list provides the choices you have as to what information displays alongside each beam. Options include: None, Label, Number, Shape, Material Set and Local Axes. Use the Label Location drop-down to specify the location of your label. Options include: Centered, Start and End.
If the Wireframe option is selected, you can include textual information alongside each beam. The Labeling drop-down list provides the choices you have as to what information will be displayed. These options are not available if the Rendered display option is selected. Use the Color Coding drop-down list to choose how the colors are assigned to each beam. Options include: None, Black, Material Set, Shape Group and Start/End. A key that defines these colors is shown in the upper-right corner of the model view. Use the Thickness drop-down list to select the lineweight used to represent the beams in the model view. Options include: Light, Medium and Heavy. Select the Pin Symbols check box to graphically display symbols at the ends of beams assigned a pinned end release.
The Rendered option produces true-to-scale renderings of the beams. Beams can be rendered along the full length, a percentage of the member length, or pulled back by a specified distance. This can allow for a better understanding of complicated intersection areas and a better view of the member cross-section. This option is also very useful for verifying beam orientations and adjusting the transparency of the rendering. The rendered elements may be presented with varying Transparency, with 100% transparency meaning completely see through, and 0% indicating completely solid. The transparency is controlled by clicking and dragging the slider bar until the desired percentage is displayed at the end of the slider bar.
For additional advice on this topic, please see the RISA Tips & Tricks website: www.risa.com/post/support. Type in Search keyword: Graphics.
