Spreadsheet Operations
Powerful spreadsheet operations may be used to view, sort and edit the input data and results. The spreadsheets and model views are synchronized. As you edit a model graphically, the spreadsheets are automatically updated and as you make changes in the spreadsheets, the model views reflect these changes immediately.
The input data may be accessed from the Explorer panel or the Data Entry drop-down on the Spreadsheets tab of the ribbon.

Click on image to enlarge it
You may edit the data, or you can add new data. You can also paste data from another application directly into the spreadsheet via the Windows clipboard. Any changes made to the input spreadsheets may also be viewed graphically.
After solving the model, results are recorded in spreadsheets for browsing. These spreadsheets may be accessed from the Results section of the Explorer panel, or the Results Browser found on the Results tab of the ribbon.

Click on image to enlarge it
You may sort the results in order to find maximums and exclude data that is not important. You may also copy this data to the Windows clipboard and use it in another application.
For additional advice on this topic, please see the RISA Tips & Tricks webpage at risa.com/post/support. Type in Search keywords: Advanced Spreadsheet.
What do you want to do?
- Move and scroll in a spreadsheet
- Select cells in a spreadsheet
- Edit a spreadsheet
- Fill a block of cells in a spreadsheet
- Perform math on a block of cells
What do you want to know?
- What special spreadsheet functions are available?
- What keyboard commands are available in the spreadsheets?
Moving and Scrolling
To move between cells in a spreadsheet, click any cell or use the keyboard arrow keys. When you move to a cell it becomes the active cell. To see a different area, use the vertical scroll bars on the right side of the spreadsheet.
| To Scroll | Do This |
|---|---|
|
One row up or down |
Click the arrows on the vertical scroll bar. |
|
One column left or right |
Click the arrows on the horizontal scroll bar. |
|
One page up or down |
Click above or below the scroll box in the vertical scroll bar. |
|
One page left or right |
Click to the left or right of the scroll box in the horizontal scroll bar. |
|
A large distance |
Drag the scroll box to the approximate relative position. |
- The size of a scroll box indicates the proportional amount of the spreadsheet that is visible. The position of a scroll box indicates the current location relative to the overall spreadsheet.
- The mouse wheel is also an excellent tool for scrolling up and down in spreadsheets or graphics. Roll the wheel or click and drag to move around.
Spreadsheet Keyboard Commands
The following keyboard commands are available:
| Key | Function |
|---|---|
|
Arrow Keys |
Move the active cell one location. |
|
TAB |
Move right one cell. |
|
ENTER |
Move to the first column of the next line. Adds new line if necessary. |
|
PAGE UP |
Move the active cell one full page up. |
|
PAGE DOWN |
Move the active cell one full page down. |
|
HOME |
Move to the first line of the spreadsheet. |
|
END |
Move to the last line of the spreadsheet. |
|
F3 |
Insert new line below current line and repeat the current values in the new line. |
|
F4 |
Delete current line. |
|
F8 |
Add new row to end using values from row above. |
Selecting Spreadsheet Cells
Before you can carry out commands or tasks in a spreadsheet, you must select the cells that you want to work with.
| To Select | Do This |
|---|---|
|
A single cell |
Click the cell, or press the arrow keys to move to the cell. |
|
A range of cells |
Click the first cell of the range, and then drag to the last cell. |
|
An entire row |
Click the row heading. |
|
An entire column |
Click the column heading. |
|
Adjacent rows or columns |
Drag across the row or column headings. |
Undoing Operations
RISAFoundation
provides you with virtually unlimited Undo capability so that you may easily correct
mistakes or just back up to try different possibilities. Simply
click the Undo ![]() button as many times as you wish to go back
a step.
button as many times as you wish to go back
a step.

Click on image to enlarge it
Another option is Multiple Undo, accessed by the drop-down arrow next to the Undo button on the Quick Access Toolbar. This will allow you to choose a specific previous action that you would like to undo.

Click on image to enlarge it
The model view and the spreadsheets will visually display the "undoing". Remember that graphic edits are undone as well.
Redoing Operations
RISAFoundation
provides you with virtually unlimited Redo capability so that you may reapply actions that were previously undone. Simply
click the Redo ![]() button as many times as the Undo button was used just prior.
button as many times as the Undo button was used just prior.

Click on image to enlarge it
Another option is Multiple Redo, accessed by the drop-down arrow next to the Redo button on the Quick Access Toolbar. This will allow you to choose a specific previous action that you would like to redo.

Click on image to enlarge it
The model view and the spreadsheets will visually display the "redoing". Remember that graphic edits are redone as well.
Editing Spreadsheets
The spreadsheets have been specifically developed for the input and editing of structural models. There are many ways to edit the spreadsheets, allowing you to quickly build your model. You may copy and move data from other locations or other files. You may also fill large blocks of cells automatically and perform math on these cells.
To Change Basic Load Cases in a Load Spreadsheet:
Use the drop-down
load list or the adjacent buttons on the Window toolbar.
Click on image to enlarge it
-
Select the cells you wish to fill.
-
Click the Fill icon from the Spreadsheet ribbon.

Click on image to enlarge it
-
Type the value you wish to apply.

Click on image to enlarge it
-
Click OK.
To Perform Math on Selected Cells:
-
Select the desired cells.
-
Click the Math icon from the Spreadsheet ribbon.

Click on image to enlarge it
-
Specify the value and the operation you wish to apply.

Click on image to enlarge it
-
Select a Function from the drop-down list.
-
Click OK.
- To cancel an entry before you press ENTER, press ESC.
- To undo a completed
entry, click the Undo
 button.
- Click the cell that contains the data you want to edit.
- Make any changes to the cell contents.
- To complete your changes, press ENTER.
- To cancel your changes, press ESC.
- To replace the contents of a cell, click on the cell and type the new entry.
- To edit the contents of a cell, double-click on the cell and use the arrow keys to locate the cursor and perform the edit.
Inserting, Deleting and Clearing Cells
To insert cells, you must insert an entire row. When you delete cells, you must delete an entire row. The row is removed from the worksheet and shifts the lower cells to fill the space. When you clear cells, you remove the cell contents but leave the blank cells in the spreadsheet.
To Insert Rows:
-
Click a cell in the row immediately above where you want the new row.
-
To insert a blank line, click the Insert Row button.

Click on image to enlarge it
-
To have the values of the current line copied in the new line, click the Add Row button.

Click on image to enlarge it
To Clear Cell Contents:
Select the cells, rows, or columns you want to clear and press the DELETE key.
To Delete Rows:
-
Select the rows you want to delete.
-
Click the Delete Selected Rows button and the lower cells will shift up to fill the space.

Click on image to enlarge it
Moving and Copying Cell Contents
Standard Windows copy and paste functions are fully supported. By using the clipboard, you may move or copy any spreadsheet data to another location in the same spreadsheet, or to another spreadsheet (provided it fits). You may also copy data to or from another model or any other application that supports copy and paste, such as a word processor or spreadsheet.
To Move or Copy Cells:
-
Select the cells you want to move or copy.
-
To copy the cells select the Copy button from the Spreadsheet ribbon.

Click on image to enlarge it
-
Click on the cell you wish to place the data in and click the Paste button.

Click on image to enlarge it
To Move or Copy Cells between Existing Cells:
-
Select the cells you want to move or copy.
-
To copy the cells select the Copy button from the Spreadsheet ribbon.
Click on image to enlarge it
-
Select a cell on the row above where you want to place the data.
-
Click the Insert Row button for each new line that is needed.
Click on image to enlarge it
-
Click on the upper-left cell you wish to place the data in and click the Paste button.
Click on image to enlarge it
To Move or Copy Cells to Another File:
-
Select the cells you want to move or copy.
-
To copy the cells select the Copy button from the Spreadsheet ribbon.
Click on image to enlarge it
-
Open the file you wish to copy the data to.
-
Click on the cell you wish to place the data in and click the Paste button.
Click on image to enlarge it
- Your data stays in the clipboard until you copy new data. You may repeat step 4 to move or copy data to multiple locations.
- When you copy information, you have the option to Copy or Copy with Headers. This is helpful if you are copying information to a spreadsheet-type program.

Click on image to enlarge it
Sorting and Finding in Spreadsheets
You may sort spreadsheets by the values in most columns. Simply click in the column you wish to sort, click on the Sort button and choose the sorting method.

Click on image to enlarge it
To locate or find a specific point, beam, or slab while in a spreadsheet, click the Find & Replace button on the Spreadsheet tab of the ribbon.

Click on image to enlarge it

Click on image to enlarge it
Default Spreadsheet Data
Many of the spreadsheets provide the option to save the current data as the default and every new file subsequent to the save will already have that data. This way, the office standards that you might use in most of your models are already entered and available in new models.
To save default data, simply click the Save as Defaults button when you are ready and the current data in the spreadsheet will be used in each new file that you create.

Click on image to enlarge it
The data is saved for the current, active, spreadsheet only and affects no other open or closed spreadsheets.
Export to Excel Spreadsheet
For all results spreadsheets, the program is capable of exporting them into an Excel Spreadsheet.
The process is as follows:
-
Right-click and select the Export to Excel option.

Click on image to enlarge it
-
Choose if you want to export the current spreadsheet tab or all tabs.

Click on image to enlarge it
-
Select an Excel file name and file save location and export.

Click on image to enlarge it
Special Spreadsheet Functions
There are special functions that help you with a particular spreadsheet.
Load Combinations Spreadsheet
You may click the LC Generator button to have the program generate load combinations
based on a variety of Building Codes. For more information, see
Generating Building Code Combinations.
button to have the program generate load combinations
based on a variety of Building Codes. For more information, see
Generating Building Code Combinations.

Click on image to enlarge it
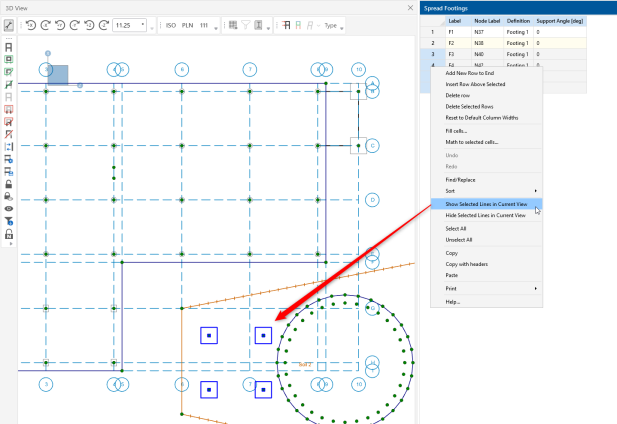
Selecting Items in the Model View
In certain results spreadsheets, there is the capability to have elements selected graphically.
The process is as follows:
-
Open the desired results spreadsheet.
-
Highlight the lines from your spreadsheet that you wish to view graphically, by clicking on the number of those lines on the far left.
-
Click the Select icon in the Graphical Highlight section of the Spreadsheets ribbon.

Click on image to enlarge it
-
Only those elements highlighted will be selected graphically.
Click on image to enlarge it
The inverse process can be used by selecting Unselect in the Graphical Highlight section of the Spreadsheets ribbon.

Click on image to enlarge it