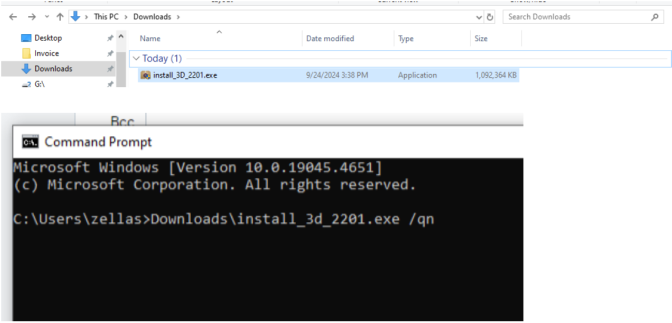
These instructions are intended for customers who want to install the program without clicking through the dialogues associated with the installer. The examples provided are based on RISA-3D version 22.0.1, and assume that the installer executable is located in the default Downloads folder. If your setup differs, adjust the instructions accordingly to fit your specific installation environment.
RISA installations can be performed silently using the Windows Command Prompt or a batch file, utilizing the /qn switch to suppress the installation dialogs. During a silent installation, any previous instances of the program will be automatically removed, so there is no need to uninstall them manually beforehand.
To install RISA programs via Silent install, please open the Windows Command Prompt application and enter:
[folder where the installer is in] \ [installer name].exe /qn
For example, if the installer for RISA-3D version 22.0.1 is in the Downloads folder, the command would be:
Downloads\install_3d_2201.exe /qn

All commands found when you run the "/?" command after a RISA installer name are default to Advanced Installer and are not configured for RISA installers.
You may run the silent install with command line keywords such as:
< C:\RISA\install_3D_2201.exe /qn SILOG="C:\MyLogs\3D2201.log" SILTY="KEY" SIDIR="C:\Downloads"
| Input | Further Instructions |
|---|---|
| SIDIR | Define an installation directory. This allows you to place the install anywhere if the default is not satisfactory. Leave this completely blank to use the default. |
| SIRGN | Region code, same single digit codes as in Setup.ini |
| SIUPD | Yes or No. This sets a registry flag for the program to notify you when a program has a new version available. |
| SILTY | This sets the license type required to use the program. The options are Subscription, Key or Network, so this must be entered to match your licensing type unless you are the default (subscription) |
| SILOG | Log filename for silent install (the special value DESKTOP is supported)(file name will be the same name as the installer exe, ending with .log: install_3D_2101.log) (Specifying a log file is recommended for diagnostic purposes) |
| SINFI | Setup.ini Filename |
Notes:
Avoid spaces surrounding the = sign in command-line, as this will cause an "Invalid command line" error. Removing the spaces ensures the installation proceeds successfully.
Fails: cmd> install_3d_2000.exe /qn SINFI ="C:\RISA Silent Configs\Setup.ini"
Works: cmd> install_3d_2000.exe /qn SINFI="C:\RISA Silent Configs\Setup.ini"
SILOG="DESKTOP" will generate a log file on the user's desktop.
Desktop file name will match the installer executable name, ending with .log ex: install_3D_2201.log
Specifying a log file is recommended for diagnostic purposes (if something goes wrong). use SINFI - setup.ini filename
If the installation is an update release (eg 15.0.3, 15.0.4) over an existing installation, the InstallationDirectory value is ignored in favor of using the value already in effect for the existing installation.
Silent install capability is not available in the demo versions.
By default, running the silent installation will proceed with the program's default selections for each installation dialog. However, you can customize the silent installation process using the Setup.ini file to provide specific instructions. A default version of this file (Setup.ini) is provided upon install in the C:\RISA User Data\[username]\Misc when installed to the default location C:\Program Files\RISA.
This file has controls for all RISA products, so you can use the same file for all products. The controls are the same for each. For RISA-3D for example here are the controls
[RISA-3D]
InstallationDirectory
ProgramGroup=
Region=
AutoCheckForUpdates=
| Input | Further Instructions | Default |
|---|---|---|
| InstallationDirectory | Define an installation directory. This allows you to place the install anywhere if the default is not satisfactory. Leave this completely blank to use the default. | C:\Program Files\RISA (executables) & C:\RISA User Data\[username]\Misc (editable files) |
| ProgramGroup | This is the name of the folder where the programs are stored from your Start menu | RISA |
| Region | Here are the other region codes (if applicable for the given program): 0 – United States, 1 – Canada, 2 – Great Britain, 3 – Europe, 4 – India, 5 – Australia, 6 - New Zealand, 7 – Mexico, 8 – Saudia Arabia) | 0 (United States) |
| AutoCheckForUpdates | Yes or No. This sets a registry flag for the program to notify you when a program has a new version available. | Yes |
Notes:
The default .BAT file created for installation is simple. This file must be placed in the same folder as the installer, and it will only consider a Setup.ini file if it is also location in the same directory as the installer. You can modify the installation directories and parameters by editing the .BAT file. An example of the contents of a .BAT file is shown below:
cd C:\Downloads\Install
install_3d_2201exe /qn LOG="C:\Downloads\Install\3d Install.log" INIFILE="C:\Downloads\Install\Setup.INI"
Let's explain the contents of this example file.
1. Input Directory for Installation:
The .BAT file allows you to specify a directory to look for during installation. This directory does not have to be where the .BAT file itself resides.
2. Log File Creation:
When the silent install runs, the program will generate a .log file. This log file provides a record of the installation process and helps identify any issues that occurred. You can specify where the .log file should be written.
3. INI File Location:
The Setup.ini file used to guide the silent installation does not need to be in the installation directory. The .BAT file lets you define a directory to locate the Setup.ini file.
Setup.ini and .Log Path Notes:
The LOG parameter specifies the complete path to a .log file written during silent install. If omitted, no log is written.