 .
. Prior to using the features of the RISA-Revit Link it is advisable to learn the proper workflow procedures outlined in the previous chapter. Also, ensure that the link has been installed on the Revit computer.
Once the Revit model is ready to be exported to RISA, be sure to save the model .
Click on the Add-Ins tab, and then click on the Export to RISA button.

The Export dialog will appear as shown below:
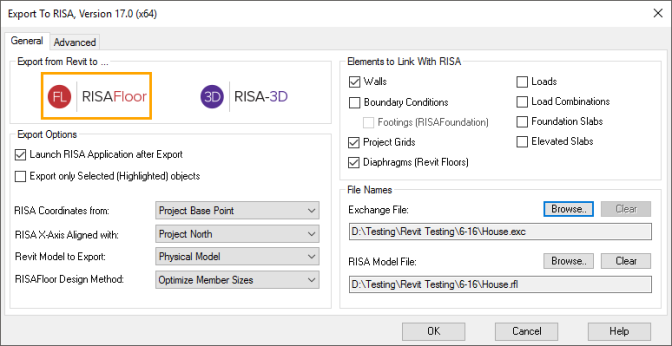
Click on the logo of a RISA application in order to specify which one the Revit model should be exported to.
Note:
Launch RISA Application exports an Exchange File to the specified destination, then launches the RISA application and automatically imports that Exchange File into the RISA application. This option is unavailable if RISA is not installed on the Revit Computer. If this box is left unchecked then the Link exports an Exchange File to the specified destination. To load the exchange file as a model in RISA go to File\Import\Autodesk Revit Exchange File.
Export only Selected objects exports only the elements currently selected in the Revit Model.
Coordinates specifies which Revit base point will be used to establish an origin (0,0,0) for coordinates in the RISA model. Either the "Project Base Point" or the "Survey Base Point" may be used to define the origin for all three Global Axes in RISA. The Survey Base Point is typically used with the Shared Coordinates feature in Revit, which allows a common coordinate system to be used across multiple Revit models.
It is important to choose one of the two base points, and maintain the use of that base point throughout all transfers back and forth. To see the location of both points in the Revit Model look under the Architecture Filter List in the Visibility/Graphic Overrides, under the Site category.
RISA X-Axis Alignment allows the export of Revit models to RISA using "True North" as the vertical plan direction, as opposed to "Project North". Revit allows a discrepancy between True North as dictated by surveying and "Project North" (Plan North) such that floor plans are not shown as skewed on drawings. If a structure is exported to RISA using True North then it is unlikely that the framing will align with RISA's Global Axes, which makes the generation of lateral loads difficult.
Revit Model to Export allows the export of either the Revit Physical or Revit Analytical model to be exported to RISAFloor. When Physical Model option is set, the Link will take the physical geometry of elevated slabs and/or foundation slabs into RISAFloor - all other elements such as walls, beams, and columns will require an analytical element. For RISA-3D only the Revit Analytical model may be exported. This option is grayed out if the model does not contain elevated slabs or if it is being exported to RISA-3D.
RISAFloor Design Method is a RISAFloor specific option. In RISAFloor a Shape Group may be assigned to members (beams, columns, etc) from which the program will automatically choose an optimum size. An example of a Shape Group would be "Wide Flange", as opposed to an explicit Shape such as "W24x55"
When "Optimize Member Sizes" is chosen the RISA-Revit Link will ignore the explicit member size specified in the Revit model, and instead assign a corresponding shape group to the member in RISAFloor. This means that the member size in Revit will be ignored, and that RISAFloor will optimize the member size. Otherwise, if "Analyze Sizes from Revit Model" is chosen then RISAFloor will perform analysis and code checks for the member sizes in Revit without optimization.
Walls specifies whether walls (and their openings) should be linked to the RISA model.
Boundary Conditions specifies whether boundary conditions should be linked to the RISA model.
Footings specifies whether Isolated Structural Foundations in Revit should be linked to RISA as Footing elements in RISAFoundation. Because RISA requires a boundary condition at footing locations, boundary conditions must also be included.
Project Grids specifies whether Revit project grids should be linked to the RISA model.
Diaphragms specifies whether the Revit Floors should be linked to RISAFloor as Decks and Diaphragm Edges.
Loads specifies whether loads should be linked between the RISA and Revit models.
Load Combinations specifies whether load combinations should be linked between the RISA and Revit models.
Foundation Slabs specifies whether Structural Foundation Slab elements in the Revit model should be linked to Mat Slab elements in RISAFoundation.
Elevated Slabs specifies whether Levels with the RISA Elevated Slab parameter turned on should be exported to RISAFloor as Concrete Slab Floors. A RISAFloor ES license is required in order to open a model exported with this feature.
Exchange File Name designates the name of the Exchange File that will be created by the Link. Browse to a target folder in which this file will be created, or browse to an existing Exchange File that is to be updated.
The Exchange File acts an intermediary between RISA and Revit. It contains data that is not stored in either the RISA or Revit files. This data allows the link to keep track of both models to ensure that they are linked correctly.
If you already have an Exchange File for the current project then be sure to specify that same file (as opposed to specifying a new one). The new information will be merged into the existing Exchange File.
Base File Name designates the name of the base file (RISA model file) that will be created from the exchange file. By default this will be given the same name and placed in the same location as the exchange file. Browse to a target folder in which this file will be created, or browse to an existing base file that is to be updated.
Prefix for RISA Labels specifies the prefix to applied to all RISA element names. For example, with the "REV_" prefix member M1 will be created in RISA with the name "REV_M1".
Merge Tolerance specifies a tolerance below which the RISA-Revit Link will automatically connect elements that are very close to each other. This is especially useful in the case of beams that (accidentally) only nearly intersect in the Revit model.
Coordinate Precision controls the rounding off of joint coordinates during export. Using the 1/8" option eliminates some issues that RISA's finite element mesher has with the extreme precision (1/256") that Revit uses.
The Export Process will Export only changed items by default. However you can override that behavior with this setting and export all of the Revit elements to RISA, regardless of whether they were changed since the last import from RISA.
Reset Revit Structural Tolerances automatically adjusts the following tolerance values in the Revit model to the indicated value. The default values in Revit are very large (6" to 12") which can cause problems with round-tripping with RISA, so the RISA-Revit Link resets these to 1" by default.
Click OK to begin the export process. A progress bar will be shown during this process.
![]()
Once the export process is complete a Report window will pop up which provides any error messages related to the export, along with a summary of elements exported.
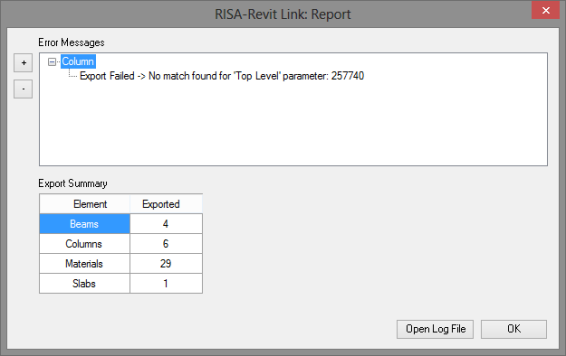
Errors will be grouped together by type. Use the +/- buttons to expand the trees and read each error. It is best to correct problems with the Revit model which generate errors before moving forward with the RISA model.
If the Launch Program option was selected during export then the RISA program will automatically be launched.
If Write to File was selected then you must import the exchange file into RISA. Launch the relevant RISA program, and Import the Autodesk Revit Exchange File using the File Menu.
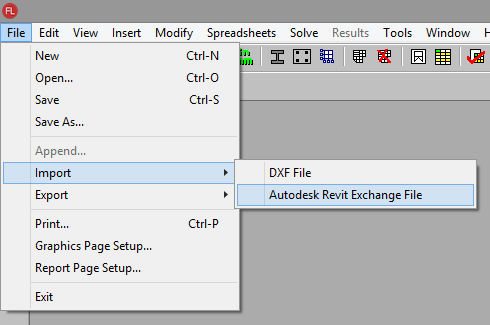
After importing the Exchange File, RISA automatically creates a corresponding base (model) file in the same folder as the exchange file.
Save the latest changes (including results) in the RISAFloor or RISA-3D model, then open Revit if it is not already open, and either open an existing model or create a new model into which the RISA model will be imported.
Once the Revit model is ready for RISA Import, be sure to save the model .
Be sure that the current (active) view in Revit is a 3D view.
Click on the Add-Ins tab, and then click on the Import from RISA button.

The Update From RISA dialog will appear:
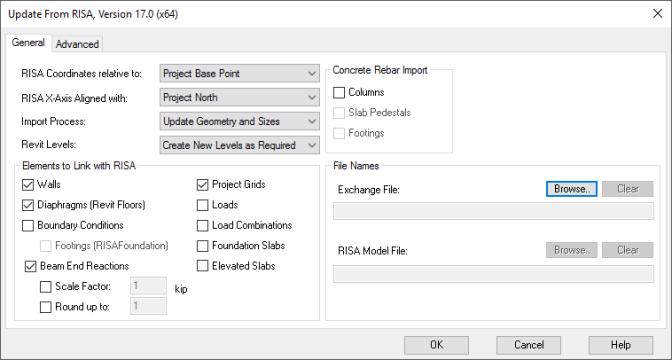
Coordinates specifies which Revit base point will be used to establish a link to the origin (0,0,0) for coordinates in the RISA model. Either the "Project Base Point" or the "Survey Base Point" may be used to define the origin for all three Global Axes in RISA. The Survey Base Point is typically used with the Shared Coordinates feature in Revit, which allows a common coordinate system to be used across multiple Revit models.
It is important to choose one of the two base points, and maintain the use of that base point throughout all transfers back and forth. To see the location of both points in the Revit Model look under the Architecture Filter List in the Visibility/Graphic Overrides, under the Site category.
RISA X-Axis Alignment allows the import of RISA models to Revit using "True North" as the vertical plan direction, as opposed to "Project North". Revit allows a discrepancy between True North as dictated by surveying and "Project North" (Plan North) such that floor plans are not shown as skewed on drawings.
Import Process sets whether geometry changes should be brought in from the RISA model, or whether only member size changes should be brought over. The "Update Member Sizes Only" option should be used where a discrepancy between the geometry of the RISA model and the Revit model ought to be maintained. See the Workflow topic for more information on this option.
Revit Levels is only available to set when importing from RISA-3D. This allows the user to prevent new levels from being created in the Revit model. When "Use Only Existing Levels" is selected all elements will be assigned to the nearest existing Level in Revit. Otherwise the Link will create new levels in the Revit model for each elevation that RISA-3D elements exist.
Walls specifies whether walls (and their openings) should be linked to the RISA model.
Diaphragms specifies whether the Revit Floors should be linked to RISAFloor as Decks and Diaphragm Edges.
Boundary Conditions specifies whether boundary conditions should be linked to the RISA model.
Footings specifies whether Isolated Structural Foundations in Revit should be linked to RISA as Footing elements in RISAFoundation. Because RISA requires a boundary condition at footing locations, boundary conditions must also be included.
Reactions specifies whether beam end reactions should be imported to the Revit model. An option exists to scale the end reactions, or specify a minimum value which smaller reactions should be rounded up to.
Project Grids specifies whether Revit project grids should be linked to the RISA model.
Loads specifies whether loads should be linked between the RISA and Revit models.
Load Combinations specifies whether load combinations should be linked between the RISA and Revit models.
Foundation Slabs specifies whether Structural Foundation Slab elements in the Revit model should be linked to Mat Slab elements in RISAFoundation.
Elevated Slabs specifies whether Concrete Slab Floors from the RISAFloor model should be imported to the Revit model.
Rebar may be imported into Revit as Rebar elements tied to concrete columns/footings/pedestals in Revit. This is currently only available for import to Revit, not export to RISA. RISA is seeking as much feedback as possible on this new feature. Please provide any feedback that you have regarding this feature to RISA so that the future development can proceed in a direction that makes this feature as useful as possible.
Exchange File Name designates the name of the Exchange File that will be loaded by the Link. Browse to the folder in which this file exits.
Base File Name designates the name of the base file (RISA model file) that is linked to the exchange file.
Merge Tolerance specifies a tolerance below which the RISA-Revit Link will automatically connect elements that are very close to each other. This is especially useful in the case of beams that (accidentally) only nearly intersect in the Revit model.
The Import Process will Import only changed items by default. However you can override that behavior with this setting and import all of the RISA elements to Revit, regardless of whether they were changed since the last export to RISA.
Beam Horizontal Projection is automatically detected by default. However, in models where beams are placed very close to other elements (such as beams or walls) Revit automatically snaps the beam's analytical line to align with the other element. Using the "Centerline" option effectively disables that auto-snapping feature, and maintains correct analytical geometry. The "Centerline" option will set all beams to have a centerline horizontal projection though, so any intentional horizontal projections within the Revit model will also be reset. This is typically only used when troubleshooting an import where beams were incorrectly snapped to nearby elements.
Remove Link is useful for changing which Revit model your RISA model is linked to. Once a RISA model is linked with a Revit model, that RISA model cannot be then linked to a different Revit model without removing the link to the first Revit model. In other words, a given RISA model may only be linked to one Revit model at a time. Check this box if your RISA model was previously linked to a different Revit model, and this is the first time you are importing it to this new Revit model.
The Correct Alignment option is only available when importing to a new (blank) Revit model. Revit has been known to incorrectly imports member geometries from certain RISA models (not RISA's fault) causing the alignment of some members to be slightly off. This can result in members that were connected to each other in the RISA model to be unconnected in the Revit model. This option fixes those alignment issues, but is unchecked by default because it slows down the import process.
Reset Revit Structural Tolerances automatically adjusts the following tolerance values in the Revit model to the indicated value. The default values in Revit are very large (6" to 12") which can cause problems with round-tripping with RISA, so the RISA-Revit Link resets these to 1" by default.
Shape Library Options allows you to specify which Revit libraries are used to load shapes when importing from RISA. When the Link searches for a shape to be loaded into the Revit model it will look at these libraries in sequential order.
The Imperial and Metric library paths are set in the Revit File Locations defaults. To modify where the Revit default libraries are go to the File Menu and choose Options/File Locations/Places
You can also specify a path to a custom library (by checking the Use Custom Library box), which the Link will use if it cannot find the shapes in the Revit libraries.
When using custom libraries you must browse to a folder which has subfolders titled Structural Columns and Structural Framing.Those folders must then have material-specific folder names, which contain the custom families. This folder hierarchy matches the Revit default folder hierarchy.
The Disable Revit's automatic wall joining feature checkbox, when selected, prevents Revit from auto-joining walls. This is particularly useful for circumventing import errors such as 'Can't keep elements joined' from RISA.
The Only update analytical model checkbox, when checked, updates member sizes in both physical and analytical models without merging or relocating physical elements in Revit.
The Round Off Coordinates drop down, allows the link to round up coordinates of elements from RISA up to three decimal places to help improve model quality when importing from RISA to REVIT.
Click OK to begin the import process. A progress bar will be shown during this process.
Once the import process is complete a Report window will pop up which provides any error messages related to the export, along with a summary of elements added, modified, or deleted.
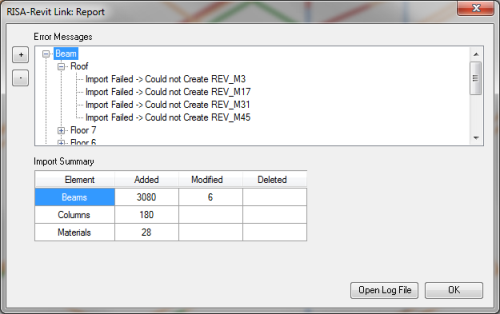
Errors will be grouped together by type. Use the +/- buttons to expand the trees and read each error. It is best to correct problems with the RISA model which generate errors before moving forward with the Revit model.
After the import is complete a new view is created in the Revit model. It is a 3D view titled RISA Import Summary. This view shows the entire model color coded, new elements colored green, modified elements colored yellow, and unchanged elements colored black.