 button.
 The primary function of RISAFloor is to design floor systems. The first thing RISAFloor does when you start a new file is prompt you to create a floor. A floor can be an original floor, a copy of an existing floor or a child floor dependent on an existing parent floor. A default area load and deck can be assigned to each floor for modeling simplicity. These options are discussed below.
To create a floor, select Floors... on the Insert menu or press the button.

This is how the floor will be referenced on the Floors spreadsheet.
This option is available for users of RISAFloor ES for one-way and two-way floor slab design.
This option is available for all users of RISAFloor for beam supported floors.
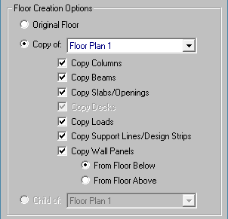
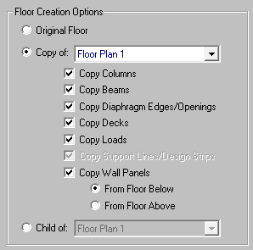
If the floor is a copy of another floor, select the floor which you wish to copy and select the individual elements you want copied. If the floor is a child, specify the parent floor to which the child is bound.
This allows you to copy a Concrete Floor Slab from one floor to another. Child is not yet available for Concrete Slab floors.
This allows you to copy a Beam Supported floor from one floor to another.
Note:
The copy feature for walls has differing behavior for wood walls vs masonry and general walls. Masonry and general walls will be extended up or down such that one wall spans between multiple floors. Wood walls will be copied up or down such that each floor has a separate wall that forms a stack of wood walls. This allows for strap forces to be calculated for the wall connections at each floor level. Openings and regions in wood walls will also be copied up/down, and will be referenced from the bottom of the wall.
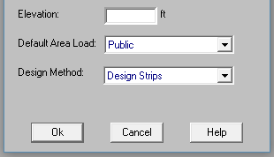
Enter an elevation for the floor from the base.
If a deck/slab edge is drawn on a floor level then the program will automatically apply a default area load and a default deck (for beam supported floors) to the area encompassed by the deck/slab edge. These defaults can be edited in the Floors spreadsheet.
Note:
There are two methods available; Design Strips or User Defined. Design Strips use the traditional methods that use Column/Middle Strips and the User Defined allows the user to define a uniform rebar.
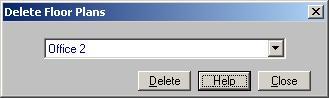
To delete a floor, select the delete floor icon ![]() from the RISA Toolbar.
Select the floor to be deleted from the drop down list and click the delete button. .
from the RISA Toolbar.
Select the floor to be deleted from the drop down list and click the delete button. .
The Floors Spreadsheet records the properties of each floor and may be accessed by selecting Floors on the Spreadsheets menu. The spreadsheet has three tabs: General, Beam Floors, and Concrete Slabs.
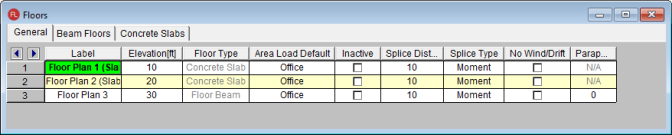
The General tab holds the general properties for all floors. The Beam Floors tab contains properties specific to beam supported floors. The Concrete Slabs tab contains properties specific to concrete slab floors.
Create a new Floor
The entries for the General tab are explained below:
You may assign a unique label to the floors. You can then refer to the floor by its label. Each label has to be unique, so if you try to enter the same label more than once you will get an error message.
Enter the elevation of the floor from the base.
This is a column that shows whether the floor plan is a Concrete Floor Slab- Concrete Slab or Beam Supported Floor- Floor Beam. Only when RISAFloor ES is licensed, you can create a Concrete Floor Slab. Note that it is not possible to change a slab floor to a beam floor or vice versa.
Enter the default area load to be used. Click on the arrow in the cell to choose from the area loads defined in the Area Load Definitions spreadsheet. The default area load will be applied to the entire floor except where local Area Loads are defined. See Drawing Area Loads to define local area loads.
Note
Check this box if you want to inactivate the floor. The solution will behave as if the inactive floor is not present. Using an inactive floor you can define a core portion of the building that is not actually part of the solution model, but which has many child floors that depend on it.
The Splice Distance Below defines the default dimension relative to the floor elevation for all splices that occur between the current floor level and the floor below. See Column Primary Data for more information on splice distances.
Note:
The Splice Type defines the default splice type as either a Moment splice or a Shear splice for all splices that occur between the current floor level and the floor below. See Column Primary Data for more information on splice types.
You may designate any floor level as a No Wind (i.e. mezzanine) level in order to omit it from the generated wind load and drift calculations. See the Load Generation - Wind Loads topic for more information.
This defines a default parapet for this floor level. For beam supported floors lower and upper level roofs can have a parapet. For slab floors a parapet can only exist at the highest level in the model.
Note:
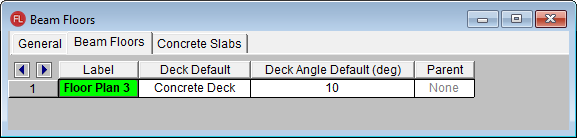
The Beam Floors tab holds the floor properties specific to beam supported floors.
Enter the default Deck that will be used on the floor. Click on the arrow in the cell to choose from the decks defined in the Deck Definitions spreadsheet. The default deck will be applied to the entire floor except where local decks are defined. See Assigning Diaphragm and Deck Properties for more information.
Note
The default deck angle defines the span direction of the default deck. An angle of “0” spans parallel to the horizontal axis. An angle of “90” spans parallel to the vertical axis. This value is ignored for two way decks.
For additional advice on this topic, please see the RISA Tips & Tricks website: www.risa.com/post/support. Type in Search keywords: Default Deck.
Displays the parent floor. This cell cannot be edited. You may detach the child from the parent by using the right click menu and selecting Detach Child From Parent on the child floor in the General tab of the Floors spreadsheet. See the Parent/Child section for more information.
 .
.
The Concrete Slabs tab holds the floor properties for concrete floor slabs.
There are two methods available; Design Strips or User Defined. Design Strips use the traditional methods that use Column/Middle Strips and the User Defined allows the user to define a uniform rebar.
This option only applies to User Defined floor levels. The uniform bottom reinforcement will be based on this Design Rule.
This checkbox only applies to User Defined floor levels. When this checkbox is turned on, the program will put continuous top reinforcement throughout the entire slab. If it is unchecked, the program will only put top reinforcement over the regions defined over the columns and walls spreadsheets. See User Defined for further information.
This option only applies to User Defined floor levels. When the Continuous checkbox is turned on, the top reinforcement for the entire slab will be based on this design rule.
A floor can be an original floor, a copy of an existing floor or a child floor dependent on an existing parent floor. When a floor is a child of another floor, it means that everything that occurs on the parent floor will be mimicked automatically by the child floor. For example: adding or editing columns, beams, walls, diaphragm / decks, etc. on the parent will automatically force the same additions or changes to occur on the child floor. This dependence does not go both ways; changes made to the child are not applied on the parent floor.
Note: