Loads
As you define the loads in the model, you will notice that each individual instance of a load type must be assigned to a particular Load Category. You will then use these load categories to define the various Load Combinations that are to be solved when a solution is performed. For more information, see Loads - Load Combinations.
You may view the loads in your model for each load category or load combination. This is an excellent way to verify the loads applied to the model. See Model View Settings - Loads to learn to do this.
Loads can be defined and applied to the model graphically, or from within the spreadsheets. There are a number of different Load Types that may be used when loading the model. Each of the discrete load types is described in it’s own section:
When loads are defined in RISAFoundation they are automatically grouped based on their Load Categories. These are the basic building blocks of the final load combinations applied to the structure. For more information, see Load Categories.
Self Weight (Gravity Load)
The Self Weight of slabs and beams is automatically calculated and included as part of the Dead Load Category (DL).
The 'Self Weight' is applied as a uniform distributed load along each beam and as an area load for the slab. The magnitude of the beam loads is the cross-sectional area times the material weight density.
Draw Loads
Click on image to enlarge it
You can graphically apply loads to the model. You can apply one load at a time by clicking the mouse, or apply loads to entire selections at once. All of the graphical loading tools can be found in the Draw Loads section of the Home ribbon.
Modify Loads
Modifying loads can be done graphically or in the spreadsheets. In the Explorer panel, click on the spreadsheet that you wish to modify. You can also go to the Spreadsheets ribbon, click the Data Entry icon and then choose the spreadsheet you want to modify. You can then move through different Load Categories by using the drop-down list on the Window Toolbar.
See Spreadsheet Operations to learn how you can modify the loads in a spreadsheet.
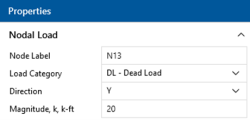
Alternatively, you can directly click on the loads in the 3D View and edit the selected load within the Properties Panel.
From the Properties Panel, you can change the configuration of the load, as well as edit the load category by selecting the desired load category from the drop-down menu.
Click on image to enlarge it
Delete Loads
Deleting loads can be done graphically or in the spreadsheets. In the Explorer panel, click on the spreadsheet that you wish to modify. You can also go to the Spreadsheets ribbon, click the Data Entry icon and then choose the spreadsheet that you want to modify. You can then move through different Load Categories by using the drop-down list on the Window Toolbar. You can use spreadsheet operations to delete the loads as well.
Alternatively, you can directly click on the loads in the 3D View and press the Delete key.

