Application Interface
Modeling features in RISASection may be accessed through the main menu, shortcut menus, toolbars, and shortcut keystrokes. You may use any or all of these vehicles to interact with the software. The main menu has the advantage of containing all of the program options and features and may initially be the simplest to use, letting you learn just one system. The toolbars contain more common options and invoke with one click. The shortcut menus present options relevant to the task at hand. The shortcut keys provide a fast way to access features should you use the program often enough to make them familiar to you. All of these features are discussed in the sections below. There are many ways to access features and the method that you will use will simply be a matter of personal preference. The good news is that you have the options.
Title Bar
The bar along the top of the screen is called the title bar, which displays
the name of the file that is currently open. The three buttons
 on the far right side of the title bar are
used to control the main window. The left button will shrink the
main application window to a button on the task bar. The middle button
will shrink or maximize the window on your screen. The right button
will close the window, prompting you to save changes if necessary.
You will also see these buttons in other windows and they have
the same functions there as well.
on the far right side of the title bar are
used to control the main window. The left button will shrink the
main application window to a button on the task bar. The middle button
will shrink or maximize the window on your screen. The right button
will close the window, prompting you to save changes if necessary.
You will also see these buttons in other windows and they have
the same functions there as well.
The actual work that you do will be in the main area on the screen,
which is called the workspace. When you open a model view, spreadsheet,
or a dialog, it will be opened in the workspace and listed in the Window
menu. You may have as many windows open as you like.
Menus
Main Menu

All of the program features may be accessed through the main menu toolbar at
the top of the screen.
File Menu
New Section File will close the current file, prompting
for saving if necessary, and will open a new file.
Open Section File will close the current file,
prompting for saving if necessary, and will open an existing file.
Save Section File will save the current file, prompting
for a name if necessary.
Save Section File As... will save the current file,
prompting for a name.
Import DXF File will prompt the user to select the DXF file to import.
Export will allow the user to save the file as a Legacy.nms (old file format) file.
Project Information will
allow you to enter information such as project name, job number, company name, designer name, and any additional remarks. It will put this information as a header on the pages of your reports.
Print Current Section will access RISASection printing options.
Page Setup... will access RISASection printing options.
Exit will close RISASection, prompting for saving if
necessary.
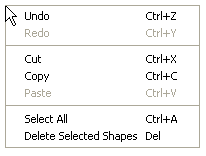
Edit Menu
Undo will undo the last edit that
was applied to the model, whether it was made graphically or in the spreadsheets. You may continue to apply Undo to remove up to 100 model edits.
Redo will reverse the last undo that
was applied to the model. You may continue to apply Redo
to remove up to 100 undo operations.
Cut will remove the selected spreadsheet cells or model view from the active window, but it will copy (see below) them to the clipboard so you can paste them elsewhere.
Copy will copy the selected spreadsheet
cells or model view from the active window to the clipboard.
Paste will paste data from the clipboard
to the spreadsheet cells.
Select All will select the entire model.
Delete Selected Shapes will delete the selected
portion of the model.
Section Menu
Add New Section to File creates a new (blank) section in the file.
Rename Section prompts for a new name of the current section.
Remove Section from File deletes the current section from the file.
Shape Layout lets you view and edit the labels, positions, and multipliers for each individual shape in the section.
Edit Current Shape lets you view and edit the labels, dimensions, and the modulus of elasticity of the currently selected shape in the workspace.
Show Dimensions toggles the dimensions in the workspace on and off.
Rotate and Flip provides tools to move selected shapes relative to their local axes.
Align and Stack provides tools to move selected shapes relative to other selected shapes.
Merge Shapes lets you merge together individual shapes into one section. This can ensure that you get an appropriate calculation of Torsional J.
Explode Shapes lets you explode a previously merged section back to the original individual shapes.
Add to Report adds the current view of the section to your report.
Results Menu
Compute General Properties computes all properties except for the torsional constant J.
Compute Torsional Constant J computes the torsional constant J.
Report Creation Wizard builds reports for printing.
Preview Current Report shows the current report on the screen.
Print Current Report prints the current report, which consists of all of the sections in the file and anything else that you have manually added to the report.
Print Current Section prints the properties, basic properties and diagram of the current section.
Options Menu
General Options... provides options for units and file locations.
View Options... provides for color choices as well as automatic refresh or recalculation.
Section Property Options... provides options for calculation of transformed section properties.
Help Menu
Contents opens the help file so that you may search the contents and the index.
Send Email to RISA initiates an e-mail to RISA.
Go to RISA Web Site opens the default Internet browser to the RISA website.
About RISASection provides version and serial number information.
Shortcut Menu
The shortcut menu is also referred to as the Right-Click menu. This is because to access the shortcut menu you simply click the RIGHT mouse button where you are working to see options that are relevant to what you are doing. For example if you right click in the workspace a menu will pop up and provide options to help you modify the section.
Perhaps the most important feature of this menu is that it is located wherever you RIGHT click the mouse. This way you do not need to move away from where you are working to select the features you want to use.
Hot Keys
Hot Keys allow you to use the keyboard to quickly access the following features:
Toolbars
The available toolbar buttons are listed below. There are equivalent menu options available for almost all toolbar buttons. The options have been grouped into two toolbars (the RISA toolbar and the Window toolbar) from the point of view of common and specific usage. The Window toolbar will affect only the current section in the workspace, but the buttons on the RISA toolbar can be used for tasks common to all views, properties, windows, etc.
RISA Toolbar
Window Toolbar
Rendered View Window Toolbar

|
Activate 3D View |
Switches from a section view to a rotating isometric three dimensional view. |

|
Reset 3D View |
Resets the view. This will reset the view in such a way that the whole Section is visible with all shapes on the workspace. |

|
Zoom In |
This button will enlarge the view and you may then scroll using the horizontal and vertical scroll bars to any required view. |

|
Zoom Out |
This button will zoom out to see more of the section in the view. |

|
Add Current View |
Add the current view to the Main Report. |
Properties Window Toolbar

|
Copy |
The selected properties are copied to the Clipboard. These copied property values can then be pasted using the Paste button. |
|
|
Add Current View |
Add the current view to the Main Report. |
Database

At the far right side of the RISA Toolbar is the Database selection menu. This menu is only available if you have selected the RISA HR Database tab from the Shape Library. The Database menu controls which Hot Rolled Steel shape database (AISC, Canadian, Euro Shapes, etc.) is displayed in the RISA HR Database menu on the Shape Library.
Status Bar

The status bar passes useful information to you as you work. It is divided into three parts located along the bottom of the main application window, just beneath the workspace.
- The first box gives the number of sections that are in the file. Note that you can create multiple sections and save them within a single file.
- The second box gives the name of the shape that is currently shown in the workspace.
- The last box on the status bar indicates the coordinates where the cursor is currently located.
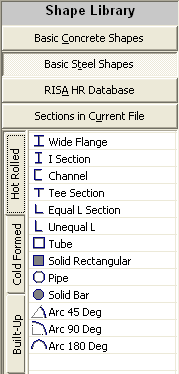
Shape Library
|
The shape library provides basic shapes that are used for building sections. Located on the left side of the application, the library is divided into four categories:
Basic Concrete Shapes, Basic Steel Shapes, RISA HR Database, and Sections in Current File.
Basic Concrete Shapes: This tab contains concrete sections with different geometric shapes. These shapes may be modified by editing the dimensions in the shape editor or by simply resizing with the mouse. The resizing with mouse will modify the overall dimension of the section and proportionally change the component dimensions.
Basic Steel Shapes: This tab contains general steel shapes that can be modified in the same way that Basic Concrete Shapes can be. It has been further subdivided with vertical tabs on the left into the following three groups: hot rolled shapes, cold formed shapes and built-up shapes.
RISA HR Database: This tab contains a database of Hot Rolled Steel members that is taken from the designated Database. These shapes can not be manipulated.
Sections in Current File: This tab contains the current sections that the user has created in this file. Note that you can create multiple sections within one file. You need to be careful with naming of your sections. See Section File Names and Toolbars to get more information on this.
|
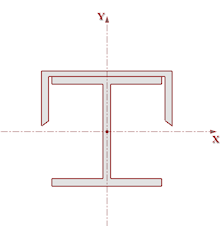
Workspace
|
The workspace is the main (center) portion of the application where you actually build and edit your section. To do this, drag basic shapes from the libraries on the left and then resize and reposition those shapes to define the section. The main axes help to place shapes graphically. The shape editor assists you with the basic dimensioning of the basic shapes that you add to the section from the libraries. The layout editor gives exact coordinates and orientation for each shape for fine adjustments. The layout grid with snapping, dimensions and layout tools may be used to help you position shapes. |
Workspace Options
- Grid Toggle: The workspace grid may be turned on and off by clicking the
 button on the Window Toolbar.
- Grid Increments: Click
 to edit the grid increments.
- Grid Snapping: Grid snapping may be turned on and off by clicking
 . When snapping is turned on the movement and resizing of shapes is restricted to the nearest grid lines.
- Dimension Toggle: Overall dimensions of the section may be turned on and off by clicking
 .
.
- Zoom: Use and to zoom the view of the workspace in and out.
- Reset View: Click to reset to a full view.
- Color Options: The colors used in the workspace may be adjusted in the View Options... under the Options menu.
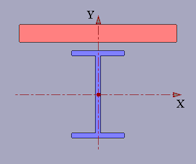
Rendered View
|
The rendered view is the upper right window that shows the rendered (solid) form of the section created in the workspace. This view has its own toolbar. The colors used in the rendering may be adjusted in the Optionsmenu.
Shapes are filled with appropriate color. The void in a predefined shape and in any shape assigned a negative shape multiplier is drawn in the background (or shown in opaque color in the rendered view).
By default, different colors are used to draw and fill shapes of different material or type. Separate colors are used for Concrete, Hot Rolled and Cold Formed shapes. To change the colors used in drawing these shapes, select View Options from the Options menu. You can specify the border and fill colors for various types of shapes as shown here.
|
Section Information
Just beneath the rendered view is the Section Information window. This window displays the basic information of the selected section.
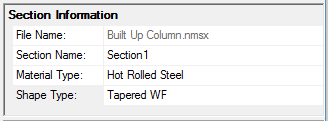
This information includes:
File Name - This is the name of the RISASection file (.nmsx file). It cannot be edited from this window; if you'd like to re-save the file with a different name please select Save Section File As from the File menu.
Section Name - This is the name of the current Section. Since each RISASection file (.nmsx file) can contain multiple Sections, this entry allows you to name them individually.
Material Type - This selection allows you the ability to assign a Material Type to your section in order to then select an appropriate Shape Type (please see below). This information is only used for integration with RISA-3D and RISAFloor and will not effect the Property Multiplier information. Currently the only options are General and Hot Rolled Steel. More Material Type options will be added to a future version of RISASection.
Shape Type - Depending on your Material Type selection (please see above), this menu changes to offer you material specific shape types. This information is used in the integration with RISA-3D and controls which sections of the code are used to perform code check calculations. Currently the only options are General (Arbitary) and Hot Rolled Steel (Wide Flange, Channel, Tube, etc.) material shape types. More material and shape type options will be added to a future version of RISASection.
Properties Window
The Properties window is located at the lower right portion of the screen. It shows the summary of the geometric properties of the current Section (the one displayed in the Workspace).
This window displays all of the calculated cross sectional shape properties for the current Section. These entries change depending on the Material and Shape Type selected in the Section Information window. Please see the Section Properties topic for more information on the individual properties.
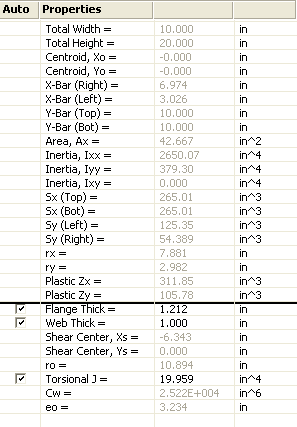
Important Note:
The values above the solid black like are calculated per the actual geometry in the workspace. The values below the line (except Torsional J) are approximate values based on the Flange Thick, Web Thick, Leg Thick values. Since RISASection cannot guarantee the calculation of these Thickness values, you can edit these and see how they change the other torsional properties which are calculated using approximate formulas.
The only exception to this is the Torsional J value. Torsional J is always calculated using a finite element solution of the actual geometry in the workspace. However, you can always edit this value if you choose.


