Quick Access Toolbar
The Quick Access toolbar provides a quick and easy way to access commonly used features and functions within the software.

The following table provides a description of each Quick Access Toolbar icon.
Quick Access Toolbar Icons
|
Icon |
Name |
Description |
|---|---|---|
|
|
New Model |
Closes the current file (prompting for saving if necessary) and opens a new blank file. |
|
|
Open Model |
Closes the current file (prompting for saving if necessary) and opens an existing file. |
|
|
Save Model |
Saves the current file, prompting for a name if necessary. |
|
|
Print Report/Graphic |
Opens the graphics print preview, report printing setup or spreadsheet printing window. |
|
|
Undo |
Undoes the last edit that was applied to the model whether it was graphical or in the spreadsheets. You can click the small down arrow to the right of the icon, to review the modeling history and revert the model back through several undo steps at once. |
|
|
Redo |
Reverse the last undo that was applied to the model. You can click the small arrow to the right of the icon to review the modeling history and jump forward to a point in time. |
|
|
Solve |
Shows solution choices to solve the model. |
|
|
Detail Report |
Activates the detail report feature. See the Results topic for more information. |
|
|
Save model view as an image |
Allows you to capture an image of the 3D view, which can be added to your report. See Printing for more information. |
|
|
Help/Info |
Provides information about the software licensing and RISA-3D version. |
|
|
Change Quick Access Toolbar |
Opens a menu that allows you to do one of the following:
|
Customize the Quick Access Toolbar
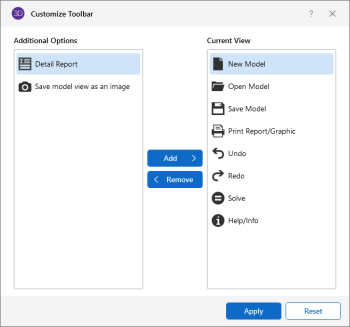
In RISA-3D you have the ability to choose the icons that appear in the Quick Access Toolbar in the Customize Toolbar window. You can add icons you want displayed and remove those that you don’t want displayed. You can also change the position of any icon currently displayed icon.
Click on image to enlarge it
Add an Icon You Want Displayed
To add an icon to the Quick Access Toolbar:
-
In the Additional Options pane, click on the icon.
-
Click the Add button.
Remove an Icon You Don’t Want Displayed
To remove an icon from the Quick Access Toolbar:
-
In the Current View pane, click on the icon.
-
Click the Remove button.
Rearrange Icons
You can rearrange the icons in the Quick Access Toolbar to whatever positions you want them to be appear in.
To rearrange the position of an icon:
-
In the Current View pane, click and hold the mouse button down on an icon.
-
Begin dragging icon up or down in the Current View panel.
A line appears above or below the icon (as shown in the following image), indicating that the direction you have started to move the icon.
Click on image to enlarge it
Dragging up moves the icon to the left on the Quick Access Toolbar, while dragging down moves it to the right.
-
Repeat for each icon you want to move.
-
Click Apply, after you have moved the icon(s) into the position(s) you want them in.
