Piles and Pile Caps
Piles and Pile Caps can be defined in RISAFoundation. Singular piles are used when individual pile locations need to be defined to support slab elements. These are best utilized for mat foundations where the mats are continuously supported by piles.
A pile cap is an element consisting of multiple piles, a cap and a pedestal that are defined at a single node in the model. A pile cap is defined at a single point location, typically where a column reaction is located.
Here, we will explain the pile and pile cap interface and modeling techniques.
For more information on individual pile results, see Pile Results. For more information on pile cap results, see Pile Cap Results.
Draw Piles
To create new piles, you can draw them using a Drawing Grid, Project Grid, or by clicking on existing nodes. You can set your pile properties up front, or you can modify these properties after drawing them.
Click on image to enlarge it
Click on image to enlarge it
To draw Piles:
- If there is not a model view already open, go to the View ribbon.
- Click the Open 3D Views icon in the Window section to open a new view.
- If you are not drawing piles at existing nodes, you need to create a drawing grid or define nodes in the Node Coordinates Spreadsheet.
- Go to the Home ribbon.
- Click the Piles icon in the Draw Elements section.
-
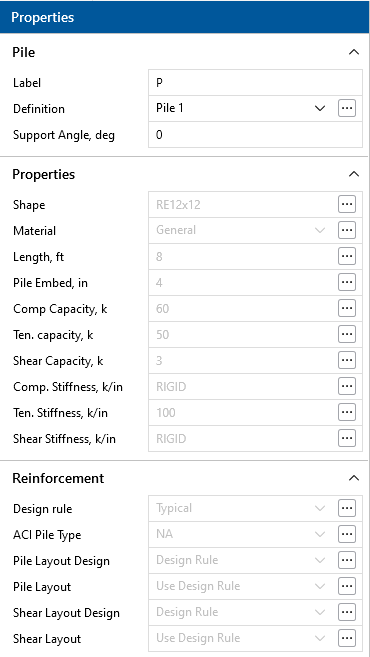
In the Properties panel, set the pile properties.
-
To start drawing piles, click on nodes or grid intersections with the left mouse button. The coordinates of the closest point or grid intersection to your cursor are displayed on the screen near your cursor.
-
To stop drawing, click the right mouse button or press the Esc key.
Modify Pile Properties
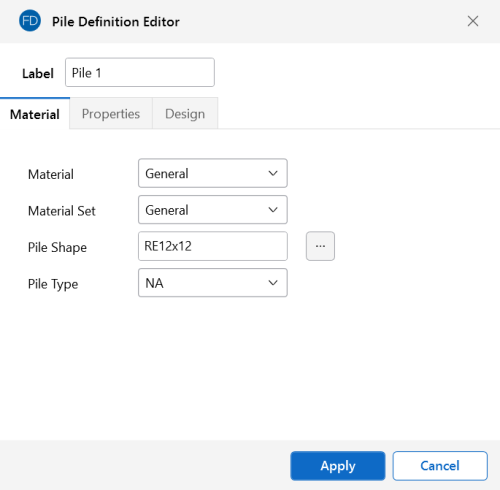
There are a number of ways to modify piles. You can view and edit the pile data in the Pile Definitions Spreadsheet, which can be accessed by selecting Pile Definitions from the Data Entry drop-down on the Spreadsheets tab of the ribbon, or by clicking Pile Definitions from the Data Entry section of the Explorer panel. You may also select a single pile (or multiple piles) to view and edit the properties in the Properties panel. Clicking the  (ellipses) button within the Definition input of the Properties panel or within the Label input of the Pile Definitions Spreadsheet will open the Pile Definition Editor.
Click on image to enlarge it
This dialog provides a quick way to build Pile Definitions. Any updates made from within this dialog will automatically update the Pile Definitions Spreadsheet. Each of the items available in this dialog are explained in the following section.
Pile Definitions Spreadsheet
General Tab
Click on image to enlarge it
Label
The Label provides a unique name for the pile definition.
Shape
For General piles, two shape options are provided: Rectangle and Circular. For other pile shapes, you can approximate them to one of these shapes (H-piles would just be added as a rectangle pile with the side dimension equal to either the depth or width). This shape will affect punching shear calculations.
The Hot Rolled Steel shape database is provided when a hot rolled material is selected. Although the full HR Steel shape database is provided, steel piles are typically pipe and H-section shapes.
The Wood shapes are available when a wood material is selected. The program assumes a constant cross section along the pile's length in the soil.
The Concrete shapes are available when a concrete material is selected. The program assumes a constant cross section along the pile's length in the soil.
Material
The pile materials available are hot rolled steel, concrete and wood. The program will use the material properties to calculate the pile tensile and compressive capacities and stiffnesses.
Click on image to enlarge it
Length
The total length of the pile in soil. The pile length is used for hot rolled steel, concrete and wood pile design calculations.
Pile Embedment
This is the depth that the pile is embedded in the pile cap. This value affects the effective depth "d" for pile cap design and punching shear calculations.
Pile Compressive and Tensile Capacities
For hot rolled steel, concrete and wood piles, the program will calculate these values based on the material properties and display Auto Calc. For general piles, the user will specify the pile allowable capacities. The program will use these capacities to do a design check of your general material piles.
Pile Shear Capacity
For all pile shapes and materials, the user will specify the pile allowable shear capacity. The program will use the user input value of the shear capacity to do a design check.
Pile Compressive and Tensile Stiffness
For hot rolled steel, concrete and wood piles, the program will calculate the stiffness values based on AE/L and displays Auto Calc. The Auto Calc stiffness entry may be overridden by a user entered value.
For general piles, this entry allows you to define the stiffnesses for your piles. By default, the compression entry is set to completely RIGID. The tension entry is set to 0, meaning there is no resistance to tension.
- The default entries for general piles are typical for most pile cap designs. To define the piles as a spring support simply enter the pile stiffnesses.
- To get an approximate vertical stiffness of an individual pile, simply take the pile capacity and divide that by the maximum possible settlement.
- When Auto Calc is displayed for the tensile stiffness of concrete piles, the program assumes only the steel reinforcement will contribute to the tensile stiffness. However, because the reinforcement is designed after the analysis, the program makes an assumption for the analysis that the tensile stiffness is 5% of the compressive capacity.
Pile Shear Stiffness
For all pile shapes and materials, this entry allows you to define the shear stiffness for your piles. By default, the shear stiffness entry is set to completely RIGID.
Concrete Tab
The concrete reinforcement can be specified in the Concrete tab of the Pile Definitions Spreadsheet. You can either use the reinforcement specified in the Design Rules Spreadsheet, or create a custom rebar layout to apply to the concrete pile.
Click on image to enlarge it
Click on image to enlarge it
ACI 318-19 provides explicit equations in Table 13.4.2.1 on allowable compressive strength for piles depending on the pile types. When ACI 318-19 code is selected, the pile type can be modified in Concrete tab. Currently, RISAFoundation supports pile types (a)-(d) in this table.
Pile Caps
Click on image to enlarge it
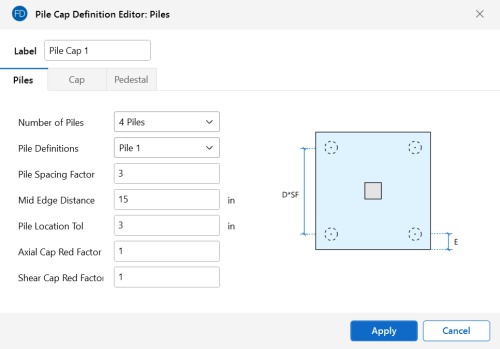
Pile caps can be drawn and modified similar to piles as discussed above. They can be defined directly within the Pile Cap Definitions Spreadsheet, which can be access by selecting Pile Cap Definitions from the Data Entry drop-down on the Spreadsheets tab of the ribbon, or by clicking Pile Cap Definitions from the Data Entry section of the Explorer panel. You may also define pile caps through the Pile Cap Definition Editor, which can be accessed by clicking the  (ellipses) button within the Definition input field of theProperties panel, or within the Label input field of the Pile Cap Definitions Spreadsheet
Click on image to enlarge it
Click on image to enlarge it
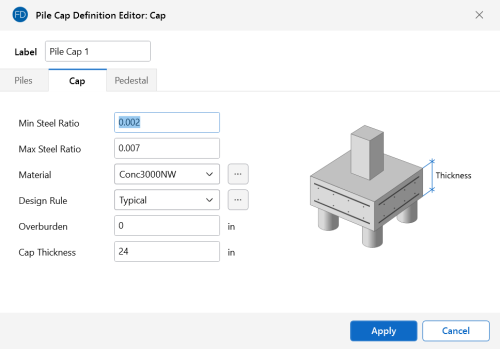
This dialog provides a quick input selection screen for building Pile Cap Definitions. Any updates made from within this dialog will automatically update the Pile Cap Definitions Spreadsheet. Each of the items here is explained below.
Pile Tab
Click on image to enlarge it
Label
This label provides a unique name for the pile cap definition. When clicking in this column, a  (ellipsis) button will become available. This will open the Pile Cap Definition Editor and allow you to update all spreadsheet entries via a single dialog.
Number of Piles
This selection defines the number and layout of piles. These pile layouts were derived from the CRSI manual on pile caps. Here are the standard layouts from the CRSI manual.
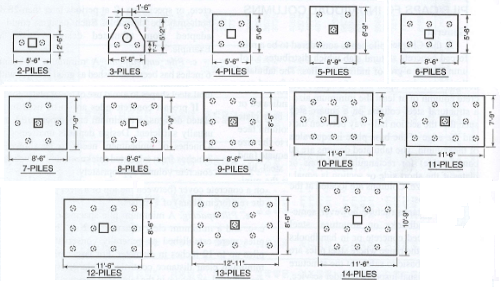
Figure 13-2 from CRSI Design Handbook 2008
- RISAFoundation uses the pile layouts from CRSI, but allows you to change the spacing, edge distance and other properties to customize your pile cap design.
- Currently, the program only includes pile cap design up to 14 piles. For custom pile caps and pile caps that have greater than 14 piles, you can use a slab with singular pile elements.
- Once you have defined your pile caps and applied them to your model, solve the model and look at the Pile Cap Detail Report for exact geometry and locations of piles.
Pile Definition
This allows you to choose a pile type for your pile cap from the Pile Definitions Spreadsheet.
Max Depth/Diameter
This entry allows you to specify the maximum depth/diameter to use for piles when considering potential shapes for the pile design.
Pile Spacing Factor
This value defines the center-to-center spacing of piles. This factor multiplied by the diameter/side dimension of the pile defines the spacing. This factor is typically used to help define capacity reduction factors for closely spaced piles.
Min Edge Distance
This value defines the minimum distance from the centerline of pile to the edge of pile cap.
Pile Location
This entry allows you to define a field placement tolerance that is acceptable for your pile caps. This affects two checks in the program: the moment demand calculation and the one way shear capacity calculation.
Axial and Shear Capacity Reduction Factors
These factors will reduce the pile capacities from the Pile Definitions Spreadsheet. The value in the Pile Definitions Spreadsheet will be divided by this value to produce a reduced capacity based on closely spaced pile groups.
Pile Cap Tab
Click on image to enlarge it
Reinforcement Ratios
When ACI 318-19 is selected for the design code, the ratio of deformed shrinkage and temperature reinforcement area to gross concrete area must be greater than or equal to 0.0018 following the stipulations of ACI 318-19 Section 24.4.3.
When other ACI 318 editions are selected, acceptable steel ratios are controlled by ACI 318-14 Section 24.4.3 (ACI 318-11 section 7.12.2.1), which stipulates that the minimum steel ratio for Grade 40 or 50 steel is .0020. For Grade 60 or greater the ratio is 0.0018.
In addition, the codes limit the maximum steel that can be used. For example, ACI 318-14 limits the minimum strain on the reinforcing steel to 0.004.
Material
This allows you to specify the pile cap material using the definitions from the Materials Spreadsheet.
Design Rules
This allows you to specify the design rule considered for the pile cap from the Design Rules Spreadsheet. For pile caps, we take information from the General, Footing/Pile Cap and the Pedestal tabs of the Design Rules Spreadsheet.
Cap Thickness
This value defines the total thickness of your pile cap.
Overburden
This entry allows you to define a soil overburden on your pile cap. This overburden weight is added to the weight of the slab for pile demand calculations. These pile forces affect flexural and shear design for the pile cap.
Pedestal Tab
Click on image to enlarge it
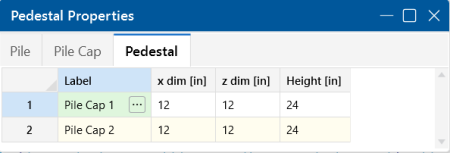
The pedestal dimensions are entered in the fields on this tab of the spreadsheet. The x dim and z dim values are the pedestal dimensions parallel to the local x- and z-axes of the pile cap, respectively. The Height is the distance from the upper surface of the pile cap to the top of the pedestal.
Pile and Pile Cap Modeling Considerations
Modeling with Piles, Slabs and Pedestals vs Pile Caps
As discussed previously, the general functionality of the program is that piles would be used in scenarios where a mat slab was drawn and piles are located at specific locations under the slab. Pile caps, on the other hand, would be used at a specific point location to support a reaction.
The Pile Cap feature has some limitations and can not be applied to all situations. When such a situation is encountered, using singular piles, slabs and pedestals within the program will almost always allow you to overcome those limitations. The piles, slabs and pedestal option allows you to create almost any custom geometries you need to consider.
The pile cap pile layouts are configured based on the CRSI design manual layouts. Thus, these configurations can not be manipulated. However, it is possible to simply create a pile cap for a concentrated force using singular piles, a slab and a pedestal. Simply draw your pile cap as a slab element, add the pedestal using the draw pedestals tool, and locate/draw your piles according to your specific pile configuration. Below is an example where this was done.
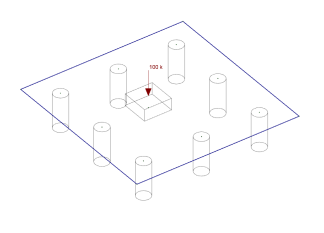
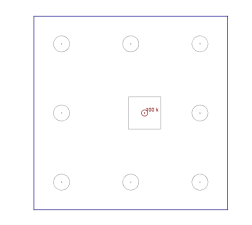
Compare this with CRSI layout for eight piles:
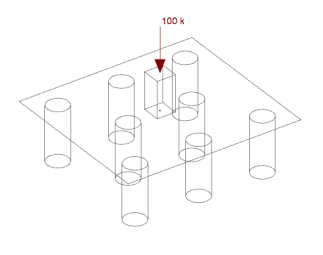
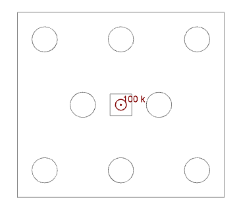
From this example, we can also see that locating a pedestal at an eccentric location to the pile group is possible. It is also possible to model identical configurations using piles, slabs and pedestals compared to a singular pile cap element. Doing this considering identical loading may lead to nearly identical results. Differences in results can often be explained by differences in rigidity assumptions between these two approaches for modeling a pile cap.
Rigidity Assumptions
Keep in mind that pile cap entities assume the cap is fully rigid. Slabs supported with piles assume semi-rigid behavior. Thus, the slab entity will place load in the piles based on the rigidity of the cap which can alter the force distribution into the piles.
Also, the default stiffness for general piles is completely rigid. Thus, you can get very different distributions of force to these two seemingly identical entities. However, if you lower the pile stiffness so that it is not completely rigid, your pile force distribution should be much more similar.
If the slab is relatively thick such that the slab pile cap behaves in a rigid manner, and the pile stiffness values are not set to be completely rigid, you will likely get similar pile force distributions between the two pile cap entities.
Pile Groups and Thickened Portions of a Slab within a Mat
Many times there are regions within a mat foundation where large loads are coming down and a pile group is required. The program does not allow you to define a pile cap within a slab, but you can simply draw in closely spaced individual piles within the slab element near the reaction. See the example below where large column loads are coming down on a mat foundation.
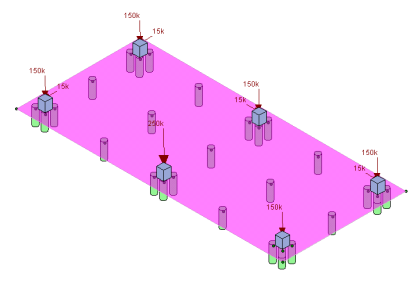
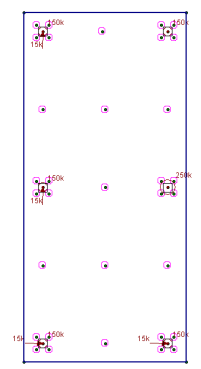
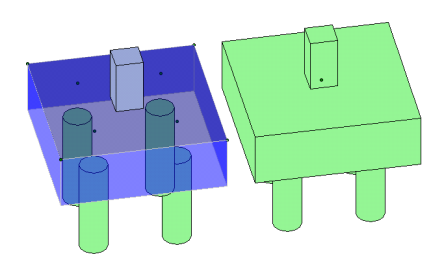
In this scenario, the slab is one continuous thickness over the entire mat. If the slab was thickened at the pile groups and around the exterior, we would simply need to draw multiple slab elements adjacent to each other with varying thickness. If two slab elements are adjacent to each other, they will have full fixity to each other. Alternatively, we can use the Modify Thickness tool on the Modify Ribbon Toolbar to adjust the slab thickness at certain locations within the slab element. Drawing multiple slab elements adjacent to each other may look something like this:
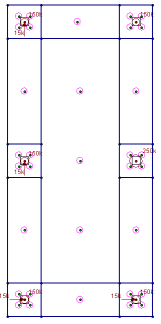
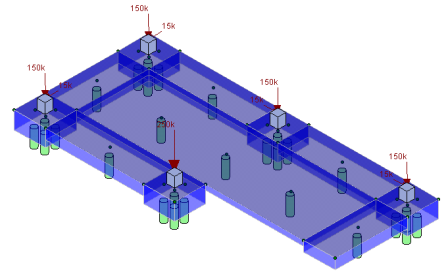
The image on the right shows a rendered view with part of the slab cut away to see the differences in thickness.
Pile and Pile Cap Limitations
The program does not consider battered piles.

