Perform a Column Code Check
ADAPT-Builder includes the ability to perform a code check of individual columns using the integrated column design engine. The user defines the properties of the columns to check through the use of a section type and assigns the section type to the columns to be evaluated. The program will then use the Section Type for each column and compare it to the loads which each column will resist. The program will return code check results deeming the column as passing code specifications (OK) or not (NG).
Code Check
A column code check can be executed from the Design Group Selection window that opens when a user clicks the Solve button to evaluate the columns. Once the code check is complete, the user can review the Code Check Results. If columns are failing or not optimized, the user can choose to Optimize Columns.The effects of P-Delta can also be included in the design of columns. Click the + sign below to expand instructions on performing a Column Code Check within ADAPT-Builder.
 To perform a Column Code Check:
- Assign Columns to a Section Type.
-
Assign Column Labels to the columns in the model.
-
Set up P-Delta Combinations (if applicable).
-
Perform a Single-Level or Multi-Level Analysis and/or generate Tributary Loads.
Note: The FEM column reactions used in the code check of columns will be based on the last run finite element analysis.
-
Set the Column Design Settings to use for the code check.
-
Go to Column Design>Design and click on the Solve  icon to open the Design Group Selection window.
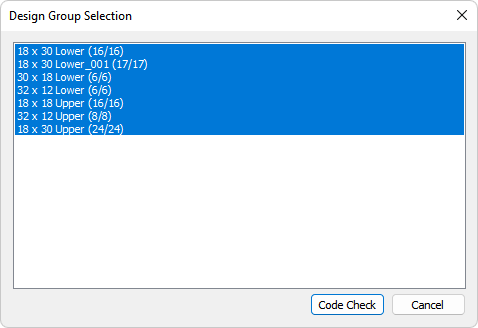
Alternatively, you can window select the column segments you want to evaluate prior to clicking the Solve icon to code check the selected columns. Note that when doing this the program will immediately jump into the code check of the columns. If using this method skip to step 9 below.
-
Select the Section Types you want to design.
-
Click the Code Check button to start the process of checking the columns code compliance.
-
When completed the program will prompt you that the process is complete. Click OK to close the window and save the results.
-
Once the Code Check is complete, you can view the Code Check Results.
P-Delta
ADAPT-Builder can account for slenderness effects through a 2nd Order (P-Delta) Analysis. For more information on P-Delta Analysis within ADAPT-Builder please view the 2nd Order Analysis topic of this help menu.
 To perform a RISA Column - Code Check including the effects of PDelta:
- Assign Columns to a Section Type.
-
Assign Column Labels to the columns in the model.
-
Set up P-Delta Combinations.
-
Perform a Single-Level or Multi-Level Analysis and/or generate Tributary Loads.
Note: The FEM column reactions used in the code check of columns will be based on the last run finite element analysis.
-
Go to Column Design-->Design Settings to open the design settings dialog window.
-
In the Design Settings dialog window change the Design Parameter option for Consider Slenderness from No to Yes.
Note: When Yes is selected for the option to Consider Slenderness, the design settings window will only show available P-Delta load combinations to design for and the Force Source options in the design settings window will be removed.
-
Set the remaining Design Settings and click OK to accept the settings and close the dialog.
-
Go to Column Design>Design and click on the Solve  icon to open the Design Group Selection window.

Alternatively, you can window select the column segments you want to evaluate prior to clicking the Solve icon to code check the selected columns. Note that when doing this the program will immediately jump into the code check of the columns. If using this method skip to step 11 below.
-
Select the Section Types you want to design.
-
Click the Code Check button to start the process of checking the columns code compliance.
-
When completed the program will prompt you that the process is complete. Click OK to close the window and save the results.

-
Once the Code Check is complete, you can view the Code Check Results.
Code Check Results
Once you have performed a column code check in the model, you can view the code check results in a variety of ways. The user can view Graphical Code Check Results through the Results View panel. Additionally, ADAPT-Builder provides a Detailed Report in XLS format containing the code check summary, column loading, detailed results and PM diagrams. The user also has the ability to view a Colorized View of Column Reinforcement.
Graphical Code Check Results
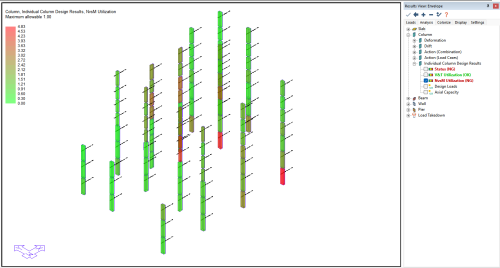
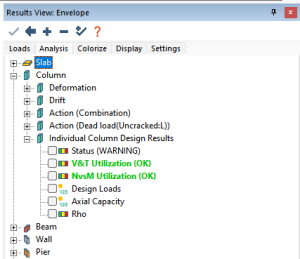
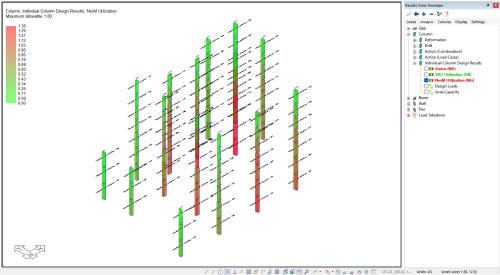
After the user has executed a column code check the user can view the graphical results through the Results View panel. The applicable results to a column code check are found in the Column>Individual Column Design Results tree as shown below. The user can check the overall column status, the V&T Utilization, NvsM Utilization, Design Loads, and/or Axial Capacity result.
Click on image to enlarge.
Click the + sign below to expand instructions on how to view graphical column code check results.
 To view graphical column code check results:
-
Perform a Column Code Check for the section types you want to code check.
-
Go to Column Design ribbon and click on the Columns Only.png) icon to show only the columns within the model. This allows for easier viewing of the column code check results.
icon to show only the columns within the model. This allows for easier viewing of the column code check results.
-
Move to an isometric view of the model by clicking on the Top-Front-Right View icon of the Bottom Quick Access Toolbar.
-
In the Results View panel select the result you want to view from within the Column>Individual Column Design Results tree. In the example below we are viewing the NvM Utilization. The status of this result is indicated in the result tree (OK or NG).
-
The results will become visible on screen. A legend for the result will appear in the upper left of the model space.
Click on image to enlarge.
-
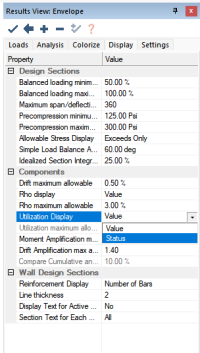
To change the display of results from Pass/Fail mode to display the value of the result, select the Display tab of Results View panel and change the Utilization to Value.
Click on image to enlarge.
-
Click Apply. The column results will appear similar to the image below.
Click on image to enlarge.
-
The user can check other results in the Column>Individual Column Design Results tree in a similar fashion.
Column Code Check Detailed Report
In addition to the graphical reporting of ADAPT-Builder, the user can export the code check detail report for each code checked column. Click the + sign below to expand instructions on how to create the detailed report for a column.
 To open the detailed report:
-
Perform a Column Code Check for the section types you want to code check.
-
When the code check procedure is complete, left-click to select a column segment you would like to see the detailed report for.
-
Go to Column Design>Reports and click the Detailed Report icon.
-
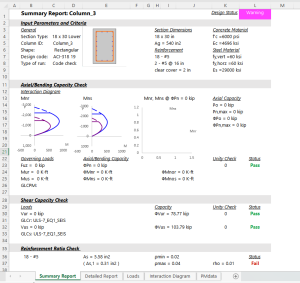
An XLS report will open with detailed reporting for the code check of the column as shown below.
Click on image to enlarge.
-
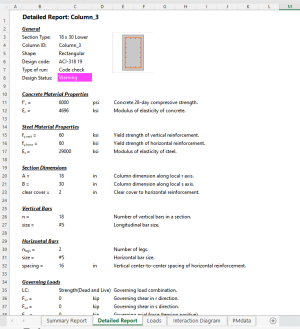
Clicking on the Detailed Report tab of the XLS file we can see more detailed column design results as shown below.
Click on image to enlarge.
Column Reinforcement - Colorize Panel
Within ADAPT-Builder the user can colorize columns based on a plethora of criteria. In the column design workflow, the colorize panel can be used to colorize the columns based on the vertical or horizontal reinforcement assigned to the column or based on the value of Rho for the column. Click the + sign below to expand instructions on to colorize columns based on the reinforcement assigned to the column.
 To colorize columns based on the reinforcement assigned to the column:
-
Click on the Colorize Panel tab to open the colorize panel. By default this tab will be at the bottom of the Properties Grid panel.

-
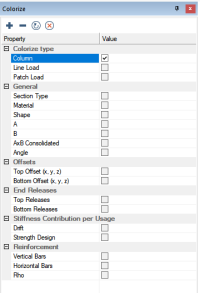
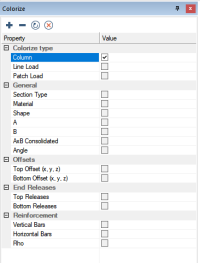
In the colorize panel that opens check the box next to Column. This will expand the colorize window to show the properties you can colorize columns by.
Click on image to enlarge.
-
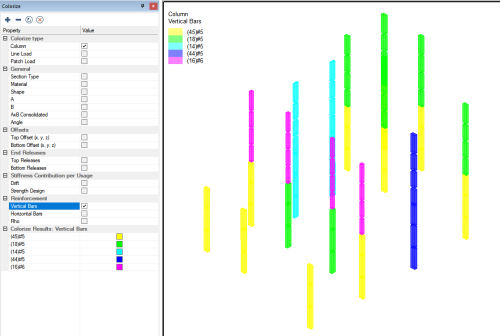
Check the box next to Vertical Bars in the Reinforcement section of the colorize panel. The program will then colorize columns based on the vertical bar size assigned to the column. A legend will appear in the upper left of the model space denoting the bar size used for each color.
Click on image to enlarge.
-
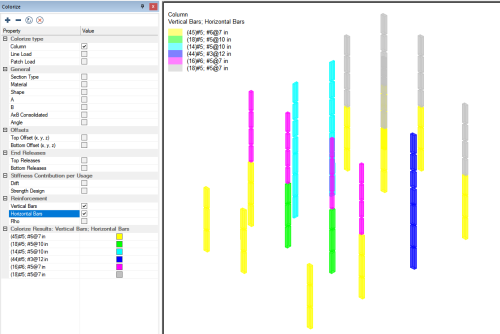
The user can then check the Horizontal Bar Size box to colorize the columns based on vertical and horizontal bar size at the same time.
Click on image to enlarge.
-
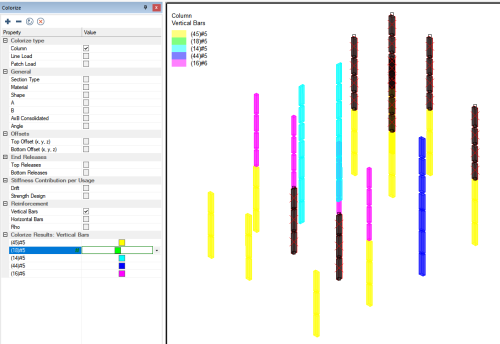
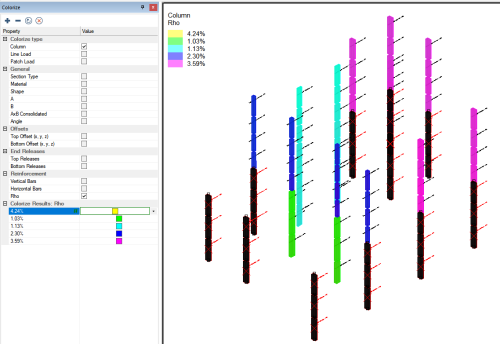
At the bottom of the colorize list is a legend of the results. The user can click on an item to select columns within that result group. The selected columns will have a red outline with a dark color shading. This is useful when you want to filter select columns to change properties for. Hold the CTRL key on your keyboard to select multiple groups.
Click on image to enlarge.
-
Colorize the column by other properties or multiple properties at once in the same fashion.
-
The colorized view can be added to a compiled report using the Reports>Take Report Screenshot tool and including the screenshot in a Compiled Report.
-
Uncheck the column selection in the Colorize Panel to clear the colorized view of the columns.
Optimizing Columns Using RISA Column - Code Check
Once results from a code check are reviewed, it is likely the user will need to revise column reinforcement, size, materials, etc. toward a final optimized design. The user may wish to define new section types for columns which are being too severely utilized, or underutilized. Click the appropriate + sign below to expand an example of optimizing columns based on Rho or NvsM Utilization.
 To optimize columns for Rho:
- Go to the Column Design ribbon and click on the Columns Only
.png) icon.
icon.
- Perform a RISA Column - Code Check.
-
In the Colorize Panel, check the Column check box. The properties you can colorize by will then become visible.
Click on image to enlarge.
-
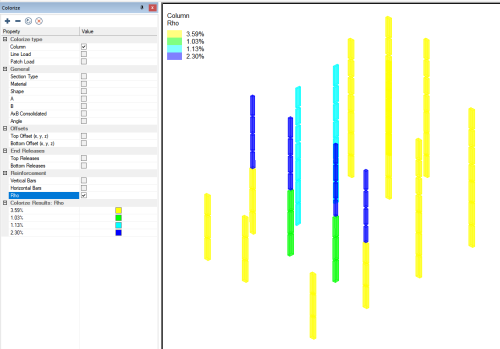
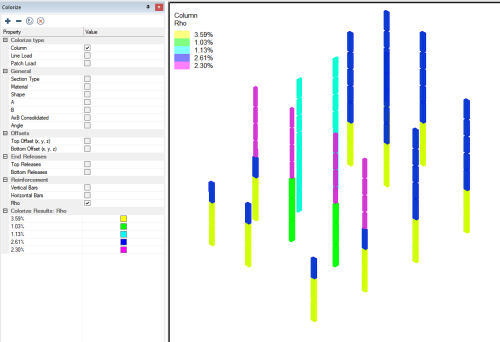
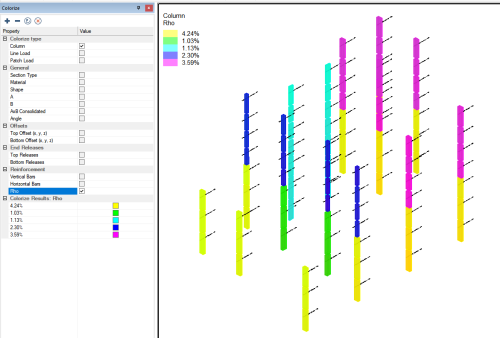
Under the Reinforcement tree, check the box in the row for Rho to colorize columns by their Rho value.
Click on image to enlarge.
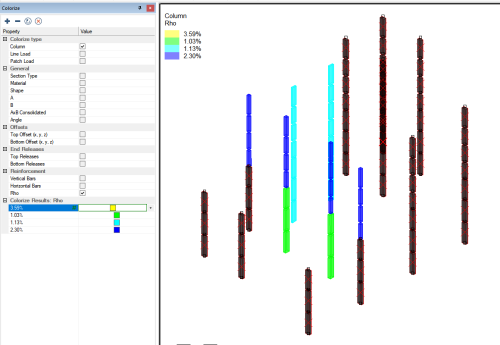
- We can see that we have one column section type that has a Rho value above 4%. In the Colorize Results, Rho legend located at the bottom of the colorize panel. Click on a Rho value listed here to select the columns with this value for Rho.
Click on image to enlarge.
-
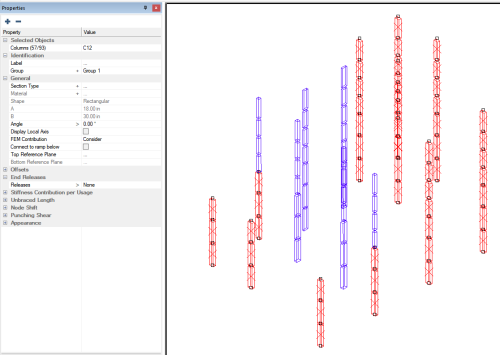
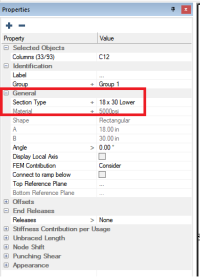
Click on the Properties tab to see if the selected columns are assigned to the same Section Type. We can see that the section type of the selected columns shows a name of 18 x 30 Lower. This indicates all the selected columns are assigned to the same section type. If the columns were not all assigned to the same section type you would see three dots for the Section Type property.
Click on image to enlarge.
-
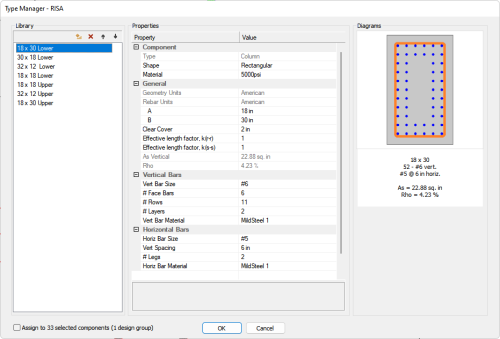
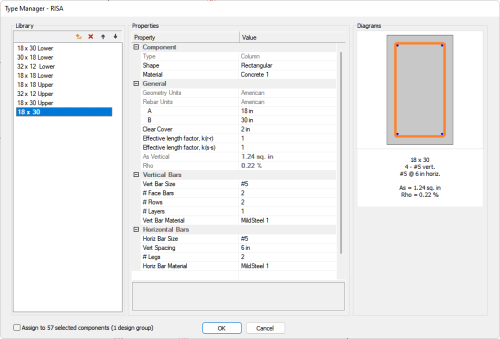
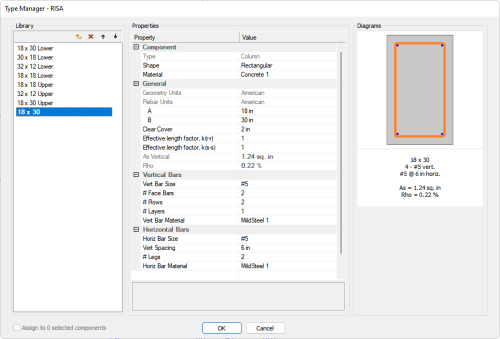
Go to the Column Design ribbon and click on the Define Section Type  icon. To open the Type Manager RISA dialog window as shown below.
Click on image to enlarge.
-
Click to select the 18 x 30 Lower section type.
-
Modify the # of Rows value for Vertical Bars from 11 to 9 bars. The changed property will be highlighted with bold text.

-
Go to Column Design>Solve.
-
Select the Section Types you want to code check.
-
Click the Code Check button to perform the code check.
-
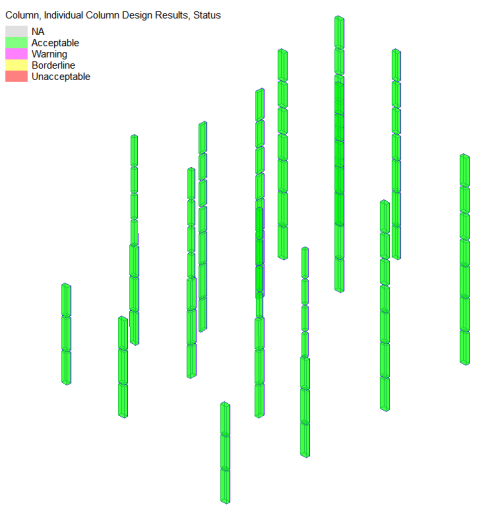
When the code check finishes, review the results to ensure the change has not effected the code compliance status of the column. We can see below the column status for all columns is still OK.
Click on image to enlarge.
-
Colorize the Columns by Rho again and we should see the updated Rho values as shown below.
Click on image to enlarge.
-
We can further optimize the columns showing other high or low values for Rho. We know that the section type is governed by the lower sections of the column and we can reduce the amount of reinforcement in the upper column sections. In this example we will click on the 3.59% Rho value in the colorize grid to select the columns with this value of Rho.
Click on image to enlarge.
-
Click on the Properties grid to see the properties of the selected columns as shown below.
Click on image to enlarge.
-
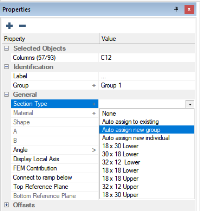
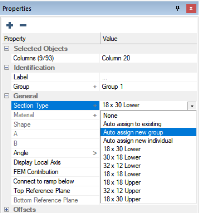
We can see that the Section Type shows a three dot value (...). The three dots indicate that the columns are assigned to different section types. To group these columns in the same section type, click on the Section Type drop down in the Properties Grid and select Auto assign new group.
Click on image to enlarge.
-
Go to the Column Design ribbon and click on the Define Section Type icon. To open the Type Manager RISA dialog window as shown below. Note that a new section type has been created at the bottom of the list and the columns have been assigned to this new section type.
Click on image to enlarge.
-
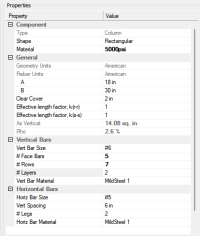
Modify the section properties as needed. You can see the modifications made in this example below. Note the changed properties are shown in bold.
Click on image to enlarge.
-
Click OK to close the Type Manager RISA dialog window and accept the changes to the section types.
-
Go to Column Design>Solve.
-
Select the Section Types you want to code check.
-
Click the Code Check button to perform the code check.
-
When the code check finishes, review the results to ensure the change has not effected the code compliance status of the column. We can see below the column status for all columns is still OK.
Click on image to enlarge.
-
Colorize the Columns by Rho again and we should see the updated Rho values as shown below.
Click on image to enlarge.
 To optimize columns for NvsM utilization:
- Go to the Column Design ribbon and click on the Columns Only
.png) icon.
icon.
- Code Check the Columns
-
Review the Graphical Code Check Results for NvsM Utilization. The below image gives an example of code check results for NvsM Utilization after running an initial code check of our model.
Click on image to enlarge
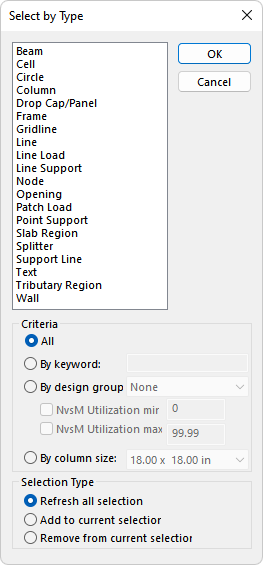
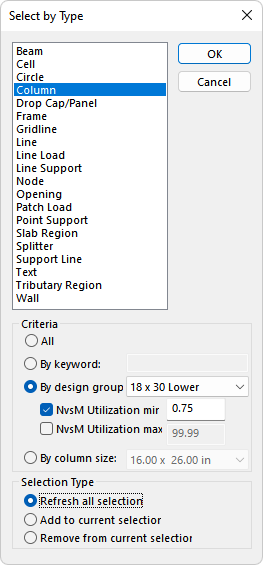
- Click the Select by Type
 icon on the Home ribbon or in the Bottom Quick Access toolbar.
-
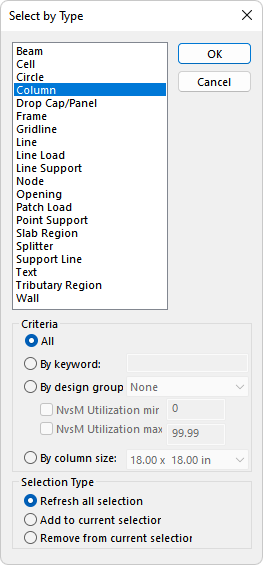
Highlight Column in the list on the top left.
-
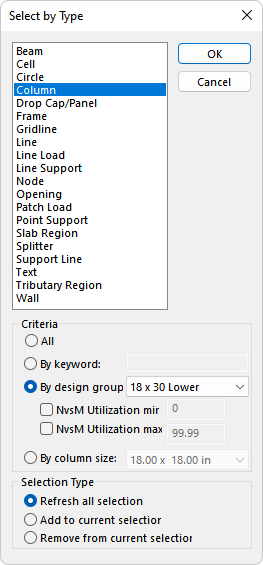
Click the radio button next to By design group and select 18x30 Lower or equivalent from the drop down menu.
-
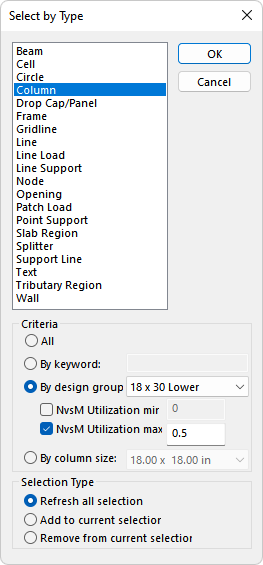
Select the checkbox for NvsM Utilization max and edit the value to equal to 0.5. This will select all columns within the 18x30 Lower section type which has a N vs M utilization less than 0.5.
-
Click OK to close the window and select the columns.
-
With these underutilized columns selected, locate the Section Type property in the properties gird and select the option for Auto Assign New Group.
Click on image to enlarge
-
Go to Column Design>Define Section Type to open the Type Manager - RISA dialog window.
Click on image to enlarge
-
Select the new 18 x 30 section type by left clicking on it in the list of section types..
-
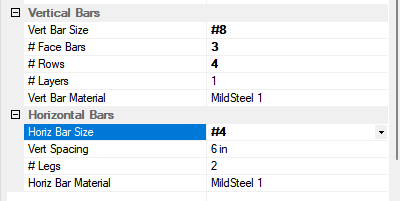
Modify the Vertical Bars and Horizontal Bars section as needed. The bold text in the below image indicate the changes we made to the new section type.
Click on image to enlarge
-
Click OK. If desired, you could also rename this section type but in this example we will leave it as is.
-
Go to Column Design>Solve to open the Design Group Selection window.
-
Highlight only the new 18 x 30 section type and click the Code Check button.
Click on image to enlarge
-
Review the Code Check Results and decide if further changes need to be made. If further changes need to be made, you can follow the steps above to make more section types for columns, or you can revise the column dimensions and/or column reinforcement for the current section types and run the Code Check procedure again to iteratively design columns using the code check tools.
-
The user can follow similar steps for columns whose N vs M values exceed 0.75 (or any other value which the user prefers). However, Select by Type screen would instead have NvsM Utilization min selected with a value of 0.75 (or other), as shown below.
 icon to open the Design Group Selection window.

.png) icon to show only the columns within the model. This allows for easier viewing of the column code check results.
icon to show only the columns within the model. This allows for easier viewing of the column code check results. 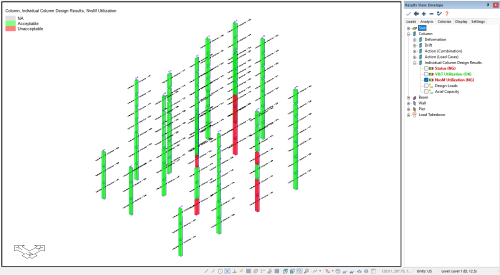

 icon. To open the Type Manager RISA dialog window as shown below.